
My oldest son was about three when we started making these cookies. That first year, we had a Christmas party with several of his little friends and all the kids used paintbrushes to paint the cut out Christmas shapes.

The kids gather around the table painting and having fun. This pic was taken a couple of years ago although it feels just like last year. The cookies are painted before they are baked. When I first started this tradition, I bought a package of paintbrushes that I keep in the kitchen to be used only for this project.
The kids were proud of their accomplishments, even though those made by the younger ones contained many holes from pushing the brush too hard.

The “paint” is made with egg yolks, water, and food coloring gel (not the liquid kind). These cookies pictured here are done and ready to be transferred to a cookie sheet and lightly sprinkled with sugar before baking.
A family tradition was begun. Through the years, the kids’ painting skills grew and we continued to make and paint these cookies at Christmas time. Eventually daughter-in-laws and a son-in-law were added to the family and the cookies took on a real artistic flair.

Close-up before baking

After baking

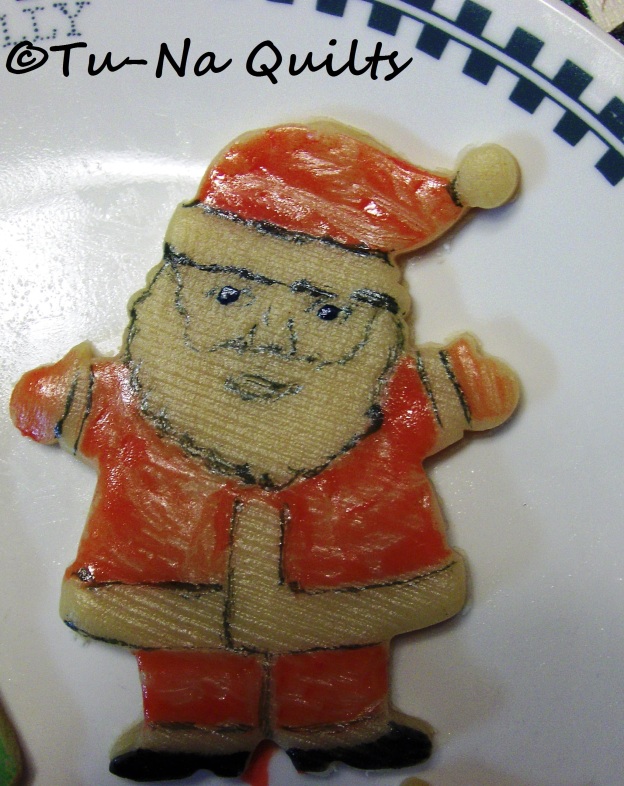
Before baking

After baking
There were a few years that time got away from us finding us rolling and painting them on New Year’s Day. A few years we even forgot. But for the most part, it’s been a yearly tradition in our family. While they look complicated to make, they are very easy.

Don’t these look too pretty to eat! I think they look like stained glass.
This same idea makes really pretty Easter cookies using bunny, butterfly, flower, carrot, and an oval (for an egg) cookie cutters. I hope you give them a try. If you do, let me know what you thought and how yours turned out.

You don’t need artistic ability to paint these cookies. Even a few simple details make them look festive.
Painted Cookies Recipe
Make your favorite rolled cookie dough or use store-bought cookie dough. I’ve included my all-time favorite rolled cookie dough recipe—I use none other when needing a rolled cookie dough.
Roll the cookies to 1/8-1/4″ thick. (I roll them to about 3/16″ or so as I like a thicker cookie). After years of practice, I don’t measure anymore but just guess.) Cut out the cookie shapes using cookie cutters of your choosing. To make rolling out the dough easier, I wipe my counter with a damp cloth and immediately sprinkle a fine dusting of flour over it.
Mix the egg yolk paint using the recipe below. Using a fine paint brush, paint each cookie as you desire. Let one color dry before adding another color on top of it—it doesn’t take more than a few minutes (this is so that the colors don’t mix or run). Sprinkle lightly with sugar (optional) and bake at 350° for 8 minutes. Transfer to a cooling rack. Enjoy!
Rolled Cookie Dough
Ingredients:
- 3 cups flour
- 1 cup butter, room temperature
- 1/2 teaspoon baking soda
- 1/2 teaspoon baking powder
- 1/2 teaspoon salt
- 2 eggs
- 1 cup sugar
- 1 teaspoon vanilla
Directions: Mix flour, butter, baking soda, baking powder and salt with a pastry blender or fork (like you would if you were making pie crust). In another bowl, beat eggs with a mixer, add sugar and blend well. Mix in vanilla. Stir egg mixture into flour mixture by hand. Roll into a ball and refrigerate at least an hour for easier rolling. If refrigerating overnight, remove from refrigerator 2 hours before using.
Egg Yolk Paint
Ingredients:
- 3 egg yolks
- 3/4 teaspoon water
- Food coloring paste or gel (NOT liquid food coloring) in your desired colors. (This paste or gel can be found at cake supply shops and hobby shops that carry food decorating supplies such as Michaels, Hobby Lobby, some JoAnn Fabrics, and can even be ordered online—I have no affiliations to any of these.)
Directions: Mix egg yolks and water. Divide into small containers like miniature muffin pans or liquid medicine cups. Add paste/gel colors and stir well. Use a new paint brush for each color. You don’t need a lot of “paint” as it goes a long way.
Virtual Cookie Exchange Blog Hop List

Here’s the list and links to other cookie bakers waiting to share their special treats and recipes with you. Be sure to click on the first link below to visit Carol at Just Let Me Quilt to enter the giveaway. Thank you Carol for hosting this virtual cookie exchange.
December 5
Tu-Na Quilts, Travels, and Eats Thanks for joining me here.
December 6
December 7
Rosemary’s Recipe – posted at Just Let Me Quilt
December 8
Thanks for stopping by. If this is your first time here, welcome to my blog where I write about the things I love: quilting, traveling, and eating—well actually cooking and baking but that doesn’t sound as good. Click here to find out more about me. I started my blog in April 2016 and wrote an introductory post for the New Quilt Bloggers Hop that you can find here. This summer my husband and I spent 9 days traveling around Minnesota visiting 72 quilt shops and I wrote many posts about those adventures. You’ll find the first post here. But don’t stop there, continue to check out the other posts about the quilt hop so you don’t miss all the fun, frivolity, and loot I acquired on that trip; plus you’ll get to visit some very cool quilt shops and see some spectacular pics of the trip.
What I Learned Today:
- I gain weight just by thinking about these cookies.
- I miss having my little ones running around the house. My house is now too quiet and time has gone by much too fast.
- Christmas seems to come faster every year.
Question: What is your traditional family food/dessert/treat for the holidays?
Linking to:
Beth at Cooking Up Quilts for Main Crush Monday (button on the sidebar)
Beth at Love Laugh Quilt for Monday Making (button on the sidebar)
Lorna at Sew Fresh Quilts for Let’s Bee Social (button on the sidebar)
Sarah at Confessions of a Fabric Addict for Can I Get A Whoop Whoop? (button on the sidebar)

I could totally see my family painting these cookies…they would love it! Thank you so much for the recipe. The things you “learned today” are things that I feel. I miss the good times of staying up late to put toys together for Santa to bring to the kids. My house is to quiet now, too! Every year when I was growing up we had Norwegian lefse. My kids still remember their grandma making it and want me to make it now. I’m not as good as she was!
LikeLike
These cookies are really quite easy to make especially if you make it in steps, mix the dough and refrigerate and the next day mix up the paint and roll out the cookies. We have so much fun with it and the masterpieces are sometimes so pretty we don’t want to eat them…but we do anyway!
LikeLike
Thank you for this recipe. What a wonderful tradition. One of our daughters and her friends started a tradition of baking cookies together – choosing a weekend before Christmas that works for all. I love how they decorate their cut-out cookies, I’m just no hand at that – no patience, but I love that they usually bake lots, (they keep count – and divide all the cookies at the end), so that I have enough to gift to others for Christmas. I too bake a few traditional and favorites, but the pressure is lessened in this area for me. Love your cookies :)!
LikeLike
I’m glad that you like these cookies. Maybe you can share this post with your daughter and they can add painting cookies to their tradition.
LikeLike
Awesome! I love your cookies and the tradition! I love to bake or make candy, but our daughters and families are not around to enjoy them with us, so I don’t do much any more. I miss that tradition. Thanks for sharing!
LikeLike
Thanks. I know as I’m getting older I can’t and shouldn’t eat so many sweets as it tends to go thru the lips and onto the hips.
LikeLike
Yours is the first family (other than mine) I’ve heard that painted their cookies instead of using icing and sprinkles. This makes me smile. I think it was an experiment the first time and we liked that the true flavor of the cookies came out and the flavor wasn’t masked by icing. My grands come over and we roll out and ‘decorate/paint’ each year.
LikeLike
I saw this idea in an old Betty Crocker kids cookbook when I first started baking over 50 years ago. I remembered it and it made for a wonderful activity for that Christmas party when my son was little and now a wonderful family tradition.
The cookies do taste great and not too sweet since there is no frosting. I think the original recipe didn’t have a sprinkle of sugar over the top but I find the sugar helps them glisten and shimmer. I don’t use much sugar.
LikeLike
This is a great idea, however I have no patience with roll out cookies!
LikeLike
Thanks. It took me years to master rolled cookie dough. Those first years I struggled but eventually developed a few tricks up my sleeve.
• The trick to roll out cookies is to start with chilled dough (but not rock hard) so refrigerate an hour or two before rolling or remove from fridge two hours before rolling.
• A light hand with the rolling pin helps. A lot of people push so hard on the rolling pin that it mashes the dough right into the counter causing sticking. Just let it roll and flatten from the weight of the pin. The handles are for guiding.
• My hint of sprinkling flour on a damp counter top really helps to prevent sticking. The damp counter makes the flour stick and then the dough won’t stick to the counter.
LikeLike
how nice – and to do this every year (or almost) with family is so nice – I make all sorts of cookies, rolled, dropped, shaped but never painted! with one daughter and family living no where near by and the other daughter near by but no children I don’t make cookies as much as I used to but for 2 years running now she brings her husband’s great niece over one day a couple weeks before Xmas and we make cookies showing the little one how it is done – she is 5 this year so will be even more enjoyable.
LikeLike
Great job of passing along your love of baking to the younger generation. Five year olds love to paint cookies! I should now; I have 5 children and they all loved to paint these at that age. I am always blown away by a child’s creativity. Maybe that 5 year old would like to try making these this year. But no matter which ones you make, enjoy the time you spend together; life goes too fast.
LikeLike
I have never seen or heard of this before and it’s fascinating! I love the tradition you started and that it has grown as the children have grown. What a fabulous way to enjoy each other’s company and fellowship. I will definitely give these a try. I do have a question – the color of the egg yolk doesn’t mess with the food coloring gel when added? (I can see adding blue and it looking green….) Thanks for sharing these on MCM!
LikeLike
Good question: Using the paste/gel colors really offsets the yellow yolk. They are worth the investment. When I first started making these, I struggled with making the blue look blue but I was using regular food color that I bought from the grocery store which is liquid and I couldn’t get enough coloring added as it was watering down the “paint.” The problem was solved when I started using the gel colors. But some colors need more gel to offset the yellow of the yolk. My suggestion is to add some gel and stir it in. You can always add more. I use a toothpick to add the gel coloring. I hope this helps.
LikeLike
I agree with your thoughts of nostalgia for days past, I used to do the cookie decorating together with my grandma and mom and son when he was small and they are such sweet memories. Your cookies are very pretty with the paint effect.
LikeLike
Family memories often center around food. Thanks for stopping by.
LikeLike
I don’t make as many cookies as I used to, but I’ve never seen cookie painting done. What a fun tradition! Traditional foods here are Holiday Cranberry Punch and Swedish Tea Ring.
LikeLike
Swedish Tea Ring sounds delicious!!!
LikeLike
It is delicious! I have a recipe that makes 4 at a time, which is really helpful if I need to bring a food item. My favorite filling is almond.
LikeLiked by 1 person
What a wonderful tradition. I grew up making and decorating Spritz cookies.
LikeLike
Spritz cookies are so fun to make!
LikeLike
What a wonderful family tradition! I love the idea of painting them before cooking them. Thanks for the recipe.
LikeLike
Thanks! I hope you give them a try sometime. They really are delicious and look so pretty!
LikeLike
You have outdone yourself again by this most wonderful story. Painting cookies, what a great different tradition to have with so many memories for your family to have and share as the years go by and families grow up. You truly have a great talent of story telling, you should have a great future ahead. Merry Christmas to you and all your followers.
LikeLike
Thanks, I’m glad you liked my story! I actually get my creative gene from my mother. She really is so clever and artistic both in the kitchen and in the sewing room. And I know she is a talented writer too.
Thanks for the Christmas wishes. And a Merry Christmas to you too! It’s hard to believe it’s December already; after all, didn’t we just get done with March?
LikeLike
I love this idea of painting cookies before they go into the oven. I love that it’s your family tradition and the lasting memories are wonderful! Merry Christmas to you and yours!!
LikeLike
I’m glad you like this idea. Are you thinking of trying it?
Thanks for the Christmas greeting. Merry Christmas to you, too!
LikeLike
What a beautiful tradition. Thank you for sharing the recipe. Painting cookies looks like a lot of fun.
LikeLike
It is a lot of fun! One doesn’t have to be an artist to make them. Even the simply painted ones look great.
LikeLike
Your family tradition of painting cookies is Priceless. Thank you for hopping and sharing your cookie recipe.
LikeLike
You are welcome. It’s a fun hop. We’ll be painting cookies again probably on Christmas day when all the family is together. With 4 grandchildren under age 7 and our 5 children with 4 spouses, there will certainly be some masterpieces produced and eaten.
LikeLike
Loved reading about your family tradition. When growing up my mom always made pierogi and my sister and I helped. It took a whole day from morning until dinner time to make them all because she always made a ton of them. We also used to have fun making all kinds of cookies for Christmas.
LikeLike
I’m glad you enjoyed the post. Your memories of helping make pierogis sounds very special too. I am not sure what a pierogi is but any time spent working together with ones you love is special.
LikeLike
I used this when my girls were little. As my grandkids came along I worried about Salmonella so I switched to a cream and powdered sugar paint. It doesn’t have that stained glass look but it is just as fun. I glaze my cookies with a thin coat of powdered sugar before painting. Your cookies are beautiful!
LikeLike
Although Salmonella in eggs is rare, I take measures to prevent any issues and make this fun activity safe.
• I make sure to tell the little ones to put the “paint” on the cookies and keep the brush out of their mouths.
• The kids are well-supervised during this activity.
• The dough is painted before baking so the baking would kill any salmonella if there were any.
• I also make sure to buy eggs from a store that keeps them refrigerated and I keep mine in the refrigerator at home and use in a timely manner.
• I look inside the egg carton before purchasing to make sure no eggs are cracked or dirty. Egg shells are porous and a dirty spot on an egg increases the chance that the inside has been contaminated.
• I inspect each egg before using and throw any away that have developed a crack no matter how fine or small.
• I do NOT wash the egg as washing or rinsing can actually cause more problems than not.
Thanks for pointing this out so that I could let others know how to do this activity safely.
LikeLike
I’ve never painted on cookies but have always wanted to give it a try. Thanks for sharing!
LikeLike
I hope you give cookie painting a try. It really is easy especially if you break it into steps, such as making the dough the day before. Just remember to take it out of the refrigerator a couple of hours before rolling or it will be too hard and stiff.
LikeLiked by 1 person
What a wonderful tradition! We make sugar cookies each year and ice them. Now my kiddo is old enough to do it on her own, but I still help ice.
LikeLike
And I bet she enjoys having your help. It’s all about making memories.
LikeLike
What a fun tradition! There’s nothing like baking and decorating cookies together for memorable moments. It’s not really about the cookies, is it?
LikeLike
You are right, it’s not about the cookies. It’s about building family traditions and making memories. In the end, the cookies get eaten but the time spent together making those cookies is relived, remembered, and cherished.
LikeLike
Pingback: Tu-Na Quilts: Santa Claus is Coming–Day Nine of the 12 Days of Christmas in July Blog Hop | Tu-Na Quilts, Travels, and Eats
Pingback: Tu-Na Eats: Cute Reindeer Cookies | Tu-Na Quilts, Travels, and Eats
Pingback: Tu-Na Quilts: Happy Valentine’s Day Finishes | Tu-Na Quilts, Travels, and Eats
Pingback: Tu-Na Quilts: Week Three of the New Quilt Blogger’s Blog Hop | Tu-Na Quilts, Travels, and Eats
Pingback: Tu-Na Eats: Virtual Cookie Exchange | Tu-Na Quilts, Travels, and Eats