

Welcome to the release of the fourth block for the Fall Into a QAL.

This QAL is brought to you by Partners in Design: Where Friends and Fabric Meet.

Presenting the Sunflower Block

- This block is 12.5″ unfinished.
This happy-looking Sunflower Block was designed by Sandy Maxfield of SandyStar Designs. Please visit her blog here where you will be able to download your free pattern.
Making This Block Just a Little Easier
You will find this block very easy to sew even though there are a lot of pieces. One of the things I’ve been reading about as you post your blocks on Facebook is that some of you are having blocks that are coming up short or small. If a block consists of many pieces or small pieces, the greater the chance that that block can fall short of it’s final measurement.
This block has a fair amount of pieces. It’s so much more fun and easier to put a quilt together if the blocks are the right size. I thought I’d give you a few tips on how I help make that happen.
I’ve been sewing and quilting for many years and sometimes my own blocks do not end up to be the size they should. In most cases, I can pinpoint the shortcut I took resulting in a smaller block. If you follow some or all of my steps, your blocks will come much closer to the desired finished size.
Tu-Na’s Tried and True Easy Steps
to Making Accurately Pieced Blocks
1. Start with Quality Tools, Machines, and Fabric
Your end result is indicative of what you start out with.
- Buy the best sewing machine, cutting tools, and fabric you can afford. You don’t have to spend a fortune but you do get a better quality product if you are aware of this. I watch for sales or use coupons to reduce my expense. Remember, best is not necessarily the most expensive.
- Keep your items in good repair. If you find you are having issues with tension or uneven straight stitching, get your machine serviced. Keep your machine clean by using a small brush to remove the lint under the stitch plate and in the bobbin area. Have your machine professionally cleaned once every year or two. Oh, and follow your instruction manual regarding the oiling of your machine. I’ll never forget the phone call I got from my daughter a few years ago. She was still using her Bernette sewing machine that Tu-Na Helper and I gave her about 8 years earlier for her 16th Christmas.
-
Emily: “Mom, listen to this.” She proceeded to sew on her machine which resulted in screeching and horrible grinding noises.
Me: “Stop, it sounds awful. When was the last time you oiled it?”
Emily: “Oil? You mean I have to oil it? Where do I find oil?”
Me: “Yes, you have to oil it regularly. It came with the machine.”
- Replace worn out blades, pins, needles, and seam rippers. Yes, these items wear out and new, sharp ones do make a big difference in producing straighter, more accurately cut pieces.

I’ve been known to ruin a new blade right away by running into my ruler. This produces a small knick on the blade causing threads to be skipped as shown above. Blades can become dull just from use. They don’t last forever. If you find cutting difficult, seeing threads left behind, or the bottom layer not cut through, try changing the blade.
Recently, I found myself having issues with my rotary cutter leaving threads uncut. I switched out the blade and discovered how easily and effortlessly I could cut the fabric. I had not noticed that I was having to press down harder to make each cut.
- End the tug of war with your seam ripper. If you struggle when ripping out seams, try using a new seam ripper. (If I find I have to rip out a seam more than three times, I recut the pieces and start over as chances are that I’ve worn the fibers or stretched out the piece.)
- Discard bent, sticky, or dull pins. Your seams will lay better if you use straight, sharp pins.
- Change your sewing machine needle. If you can’t remember the last time you changed it, it probably should be done. Some recommendations are to change it after every 8 hours of sewing and others recommend changing it when starting a new project.
2. Prepare the Fabric
- To pre-soak or not? I only pre-soak (in a tub of water not using the washing machine) red, blue, or black fabrics. I know that some quilters pre-soak everything and others nothing at all. I’ve found that using quality fabrics reduces the chance that the colors will run or that the fabric will shrink. I’ve heard from a quilter/store owner/quilt teacher (and found it to be true) that it doesn’t matter if you pre-soak some and not all of the fabrics used in one quilt. I line dry the pre-soaked pieces. Of course, pre-cuts smaller than fat quarters should not be pre-soaked.
- Cut yardage into a manageable size which for me is half yard or fat quarter chunks. I find nothing is worse than to wrestle four yards of fabric on top of my cutting surface to cut out one 2” block.
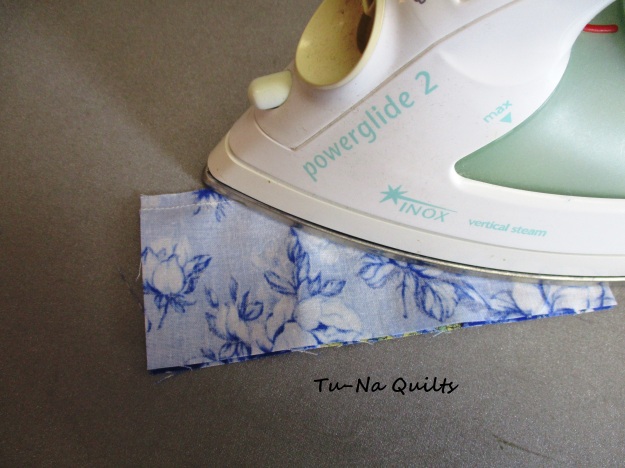
- Iron. Whether or not I pre-soak my fabric I still iron it before I cut. Before ironing, I spray a fine mist of water and scrunch up the fabric or roll it up, depending on my mood, and let it sit on my ironing board for a few minutes. This allows the fabric to soak up the water evenly.

I prepare several pieces for ironing. By the time I’ve prepared the last one, the first one is ready to be ironed.
Then I iron it by sliding my iron back and forth or side to side going in the same direction as the lengthwise grain of the fabric. I often turn the fabric over and iron the wrong side of the fabric always sliding the iron in the direction as the lengthwise grain.

If I don’t have a selvedge edge, I find the lengthwise grain by holding onto the same side of the fabric and gently stretching. The lengthwise grain hardly stretches at all. The crosswise grain stretches a bit. If I hold one corner in one hand and the opposite diagonal corner in the other hand and stretch it, the fabric stretches a lot; this is called bias. Respect that bias; it can be your best friend or your worst enemy.
The lengthwise grain, which is parallel with the selvedge, doesn’t stretch as much as the crosswise grain, which is perpendicular with the selvedge. I DO NOT ever put water in my iron. I do not use steam to press at all even when pressing Tu-Na Helper’s Hawaiian shirts. I just use the old-fashioned spray on some water, roll it up, and then iron. I also avoid ironing anything in the direction of the bias.
- To starch or not to starch? That is a good question. I starch the fabric after ironing if I will be cutting small pieces-anything 2” or less is small for me, cutting pieces on the bias, or sewing a seam on the bias. First, I spray a light mist of starch (I prefer Best Press) on the wrong side of the fabric and let it set for a few minutes. Then I press on the right side by ironing (sliding my iron from side to side) along with the lengthwise grain.
3. Cut with Accuracy
Cutting accurate pieces depends on how the ruler is positioned on the fabric and how you hold your rotary cutter while you are cutting.

You can see how I’ve lined up the ruler with my fabric so I will cut a full 1.5 ” square.
- Walk the line. To ensure cutting an accurate block, place the fabric so that it aligns just to the left of the desired line on your ruler. You should see fabric in that open window if you have one on your ruler (as noted by the arrows in the pic above). It’s hard to end up with the right size blocks if your pieces are cut too small to begin with.
- To have and to hold. When holding your rotary cutter, hold it so the blade is straight up and down as you cut and not slanted to the right or left as you slide it next to the ruler. It makes a difference.
- Slippin’ and a slidin’. Rulers can and do slip. Even slight slippage of the ruler can cause blocks to be cut too small or too large. Keep your hand firmly on your ruler. Don’t cut further than where your hand is holding down the ruler. Without moving the cutter, reposition your hand to hold the ruler tightly. I’ve also seen where a hand weight set on the end of the ruler to hold it down will help keep the end in place and then you don’t need to move your hand.

I set my 3# hand weight so one end of it was on the ruler and the other on the table. This held it in place very firmly so I could cut all the way to the end of the fabric without repositioning my hand. This works so good that my weight is now residing on my cutting counter.
4. Achieve Accurate Seams
This is often easier said than done. But I’ve found a few good tricks up my sleeve to help me accomplish this.
- Know what your settings are to make a scant 1/4″ seam. To check it, cut three 1.5″ x 5 inch strips and sew them together. Press seams to the outsides. If you can lay a 1″ wide ruler on the right side in the middle strip and it fits nicely with no gaps, then you’ve accomplished sewing a scant 1/4″ seam as pictured.
 If you find that the ruler doesn’t lay flat, readjust by either moving your needle position to the left or right or by using a different spot on your machine bed as a guide to create a scant 1/4″ seam. You can also measure your square if you don’t have a one inch wide ruler, it should be 3.5″ x 5″ exactly. It takes a bit of work to begin with but it is so worth the time spent. Once you’ve found your settings, write them down. It’s easy to forget what they are. (I find this helpful as I have two different machines in two different houses in two states very far apart.) Every so often recheck that scant 1/4″ seam; I usually do so whenever I start a new project or if I’ve been away from my machine for several weeks.
 - Do Not depend that your quarter-inch foot is 1/4″. I’ve found that quarter-inch feet are different widths on different machines. Taking a bit too wide or too narrow of a supposedly quarter-inch seam adds up resulting in a block that is not the correct size especially if the block has many pieces. So know your measurements to make it right.
- Stitch those HSTs correctly. When stitching a HST, stitch just to the right of the diagonal stitching line. This will help give it that scant seam so that when it is flipped back, it will meet the corner.

When I sew HSTs, I sew to the right of the line, towards the corner that I will be cutting away. For any square that is 2.5″ or larger, I always draw another line 1/2″ away from the first line. This becomes a bonus HST that I will use in another project rather than just throwing it away.
- Start and end every seam with a scrap or use a leader/ender project. I’ve always had the problem that my beginning and ending of the seams just weren’t accurate; they were either too narrow or too wide while the interior of the seam was just right. Once I started using a scrap to sew over, setting my needle to stay in the down position, and butting the next block up to the scrap or prior block, my beginning and ending of the seams are more accurate. Some people use this idea but sew on another project (called a leader/ender) and while I’ve tried it, it just doesn’t seem to work for me as I become easily distracted by that project and forget to do the one at hand.

I reuse my scrap a lot. To position my block, I keep my needle down and slightly lift the presser foot and slip the block under it. Then I sew.
- Pins are helpful. Use them but don’t sew over them. Doing so can bend your needle which can damage the bobbin case throwing off your stitching or causing your thread to break often.
- Use a walking foot if you have one.
- Use a Purple Thang or other small object to hold that last bit of fabric as it slides under the presser foot. If you find that you have difficulty keeping the ending of seams straight it could be because the feed dogs and narrow quarter-inch foot do not have enough surface or pressure to do so.

I like to use a purple thang as it is soft, just in case my needle gets too close. As you can see, I also like to use an open toe foot so I can see where I’m sewing. This adds to the problem of not having enough surface area on the quarter inch foot to hold down the fabric.
Solve this problem by either adjusting the pressure of the presser foot if your machine has this feature or by using an object to keep the fabric from slipping around. This solves the problem of holding the fabric in place because the feed dogs and the narrow quarter-inch foot just can’t do it.
5. Sewing is Not an Olympic Sport
Slow down. This is not ever a race to be the first one done. Sew slowly and steadily. If you find yourself putting the pedal to the metal, then you may find your seams are not straight. If you have the ability to change speeds on your machine set it no higher than the medium speed.
6. Solving Another Pressing Issue
- Set the Seam. Before you press your seam open or to the side, first press the seam closed. This helps imbed the thread into the fabric which helps when you do the next step.
- Press towards the side. Lay the side that you want to press the seam towards on the top then slide the tip of the iron along the seam. Then I nudge the seam towards the side with the side of the iron
 and finally press (lift iron and set it down) the seam flat doing so without sliding.

If the pattern calls for the seam to be pressed open, I would turn it over at this point and press one of the seams to the side making the seam lay open.
I then turn it upside down and give it another press. Failing to do a good job pressing seams (so no extra fabric is included) is one reason blocks fail to make it to the correct size.
- When pressing seams on a HST (Half Square Triangle) take care to not press towards the bias as it will stretch the square out of shape. Rather use the techniques listed above. Do not iron as pictured below.

Avoid ironing towards the corner as this will stretch the square out of shape.
7. Trims Are Not Meant Just for Bangs
After stitching a HST or flipping a corner, I will square (or trim) my block to the required size. Some patterns will even give you the measurements to check your block after sewing several sections together. Don’t skip this step.

8. Practice Makes Perfect
My mama was right (and maybe yours was, too) that practice makes perfect or at least better. I’ve found that the more I sew, the better I get at it and the better I get at it, the more I enjoy it. Thus, the more I enjoy it, the more I want to make. My list of quilts that I want to make is very long; I think I’ll be getting lots of practice!
Join this QAL
You can join in anytime. Each 12.5″ (unfinished) block will be released every other Tuesday with the last one scheduled for release on October 16th. You are free to make these blocks any way you want. However, if you are wanting to enter the contest, be sure to read the rules found in the Enter to Win section below to make sure your entry counts.
The patterns will remain free on the respective designer’s blog until November 13, 2018. Designers may choose to keep them free after that time or make them available for a charge in their shops. The final finished top containing all 12 of these blocks (it doesn’t have to be quilted) link up for the mega giveaway is November 13th at 11:59 EST.
Enter to Win
A winner will be selected at random from all the block posted for this block. Details are listed below.

ENTER FOR A CHANCE TO WIN THESE FOR MAKING A SUNFLOWER BLOCK
Two printed patterns from Amanda Murphy Design
“Folk Garden” a set of three 16” x 30” mini quilts
“Folk Art Flowers” a 62” x 80” quilt pattern
Both patterns are donated by Abbie of Sparkle On. Thanks, Abbie!
Entering to win the prizes above is as easy as 1, 2, 3.
- Everyone (You must be 18 to be able to enter to win prizes) gets to participate because International entries are welcome! You do NOT need to have a blog to enter. Hosts and designers are not eligible to win.
- Make a block using Sandy’s pattern. Take a picture of it. Slight variations of the pattern are ok such as embellishments but keep your block true to the designed pattern if you are entering the giveaway. The block should definitely be recognizable as one made from this free pattern. Deviating too much (or substituting a different block entirely) will cause your entry not to be counted. If you have questions if it’s allowed for entry into the giveaway, please ask me before you cut.
- Post a picture of your block before 11:59 PM EST, July 9th either on the linky party found on Sandy’s post here, on the Facebook page, or on Instagram #fallintoaqal.
Winners are drawn from the eligible pictured blocks and prizes awarded every other week with a mega grand-prize at the end for a finished quilt top/flimsy (it doesn’t have to be quilted) using all 12 of the block patterns.
See These Hosts for Inspiration and Tips
on Making the Sunflower Block
Block Designer — Sandy Maxfield of SandyStar Designs. Please visit her blog to download your free pattern.
- April at JANDA Bend Quilts
- Vanda at Quilting with Vanda
- Sherry at Powered by Quilting
- Bobbi at Snowy Days Quilting
- Jennifer at The Inquiring Quilter
- Abbie at Sparkle On
- Karen at Tu-Na Quilts, Travels, and Eats Thanks for stopping by. I hope you’ve enjoyed seeing my Sunflower block.
Thank You to Our Sponsors
These are our prize sponsors throughout the QA. The sponsor for each bi-weekly prize varies. The Final Grand prize bundle and sponsors will be announced 10/16/18.

In addition, the following members of Partners in Design are providing prizes as well:
- Abbie at Sparkle On
- April at JANDA Bend Quilts
- Kathleen at Kathleen McMusing
- Sandra at Sandra Healy Designs
- Sherry at Powered by Quilting
- Vanda at Quilting with Vanda
Come on Back for the Next Block Release
Join me on July 10th at 12:00am EDT for the release of the fifth block designed by Kathleen McCormick of Kathleen McMusing. It’s sure to be a beauty.
Don’t Miss Out on My Previous Fall into a QAL Posts
Tu-Na Quilts: Big Announcement!!! (QAL introductory post with a schedule of when the blocks are released and a sneak peek at the fabrics that I’ll be using.) Yes, I’m seeing spots!
Tu-Na Quilts: Block One—Hedgehog
Tu-Na Quilts: Block Two —Harvest Basket
Tu-Na Quilts: Block Three — Bonfire

What I Learned Today:
- Working in a clean space is helpful, safer, and more fun. I took time today to clean my cutting counter.
- I actually found that I had a second cutting mat because of #1.
- There’s a lot to do before one starts to sew.
- I’ve done this so many times that it’s become habit but sometimes I start sewing without thinking.
- Not thinking is what gets me into trouble.
Question: Do you have other tips that help you sew accurate blocks?
Thanks for stopping by and do come again. If you want to be notified when my next post publishes, please consider subscribing using one of the three methods available on my sidebar: email, WordPress, or Bloglovin. I’d love to have you be part of my reading family.
Karen, Tu-Na Quilts
At this time I am not affiliated with any company, services, or products that I mention here on my blog. I just happen to like them.
Linking to:
Linky Tuesday at Freemotion by the River
Let’s Bee Social at Sew Fresh Quilts
Midweek Makers at Quilt Fabrication
Wednesday Wait Loss at The Inquiring Quilter
WIPs at Silly Mama Quilts
Finished or Not Friday at Busy Hands Quilts
Can I Get a Whoop Whoop? at Confessions of a Fabric Addict
Main Crush Monday at Cooking Up Quilts
Monday Making at Love Laugh Quilt
Moving It Forward at Em’s Scrapbag

This is a very thorough post Karen! I am going to be recommending this post to a lot of quilters. Thank you for going to all that effort to put so many important points in one place!
LikeLike
Once again, your block is just delightful. I like the fresh green you selected for the background. And your tips are great reminders. I need to slow down more. I am always in a hurry. And I need to do a better job of pressing. Thanks for the nudge!
LikeLike
Some good points there Karen . When I first started it took me a long time to understand a smidgen off on each square ended up rather a lot in the finished blocks
LikeLike
Good Morning Karen!
Wonderful tips for getting this block to turn out perfectly, along with anything else in the works. I love these fabrics and your blocks are coming together so nicely. Happy Tuesday! ~smile~ Roseanne
LikeLike
Great tips, Karen! I switched to a ruler that has a better grip than my former one. It has helped quite a bit in getting the cutting more accurate.
LikeLike
You are so right!! Having a good ruler that doesn’t slip and slide around is a must! I’m starting to replace my older rulers with the Quilter’s Select as I really love that one but they are so expensive. A cheaper fix is to place some of those dots on the underside of the ruler. I have them; just haven’t put them on.
LikeLiked by 1 person
You’ve given us a master class in accurate piecing, great post!
LikeLike
that is a cute block – I like your center fabric for the center of the sunflower I made a nice sunflower once using a mariner’s compass pattern and found the perfect piece for the sunflower center too.
thanks for the reminder on the cutting blade – I’m pretty sure mine needs changing!
LikeLike
I love your set of hints – they are perfect and good reminders for all – not just beginners. Lovely block and those dots are crushing this QAL
LikeLike
Karen – love your sunflower block. So pretty in polka dots! Your tips for getting the appropriate sized block are right on. Doing this QAL has allowed me to become more accurate in cutting and sewing blocks, especially when there are more pieces – because there are more opportunities for error. Thanks for the summary.
LikeLike
You are so right. QALs are perfect for practicing skills and learning new ones. The more I sew, the better I get and the easier it becomes. My mama was right, “Practice makes perfect.”
LikeLike
This is such a great post Karen! There is a new product coming out that will make ALL rulers grippy… it’s pretty neat. When I get some I’ll definitely be sharing! Accurate cutting and piecing make all the difference!
LikeLiked by 1 person
Let me know about that product ASAP. Ruler slippage is so common and so frustrating. It’s great to know that it can be solved.
LikeLike
It’s a new Odif product called Grippy. It’s not released yet, but I got to play with it at Quilt Market. It’s amazing.
LikeLike
This is a fabulous post! You’ve included so much detail. There really are so many things that go into getting our blocks to come out just right. Thanks for taking the time to write this.
LikeLike
Thanks for the reminders. I really need to oil my machine….and learn how to press properly. I never knew about not pressing towards the corner of a block. Great post.
LikeLike
Karen, your Sunflower is the epitome of happy! 😊🌻 I really appreciate the time you took to explain all your tips for getting a correct size block. Your info will help me achieve the right results more consistently and you have reminded me to oil my machine!
LikeLike
Pingback: Fall Into a QAL Block 4 Release! | Sparkle On!
That was fun to read, Karen! I’m nodding my head all the way down your list. =) I leader-ender constantly! It’s just a matter of having something that is a “someday” project or a scrappy, wonky project, and I don’t usually get carried away on it (except sometimes at the end, because it’s almost finished after a couple of years!). A vortex quilt is a perfect leader-ender, as are wonky log cabins in 6.5″ size. They require no thought at all, but over time, they add up to something.
LikeLike
P. S. I also meant to say that your polka dots are going along perfectly! I love your sunflower.
LikeLike
These blocks are just too cute! I am tempted to get started…. do need another project going, right?????
LikeLike
First – your completed block look awesome – love your palette!
Second – those are wonderful tips and my favorite is that “sewing is not an Olympic sport”. I thought so we I first started quilting and I tried to get everything done as fast as possible (and oh my did I make mistakes!). That statement is a great reminder that we need to slow down and enjoy the whole process 🙂
LikeLike
Such a pretty sunflower! It looks great with your other blocks too – this will be a very fun quilt when all the blocks are finished.
LikeLike
These are great tips Karen and you explained everything very well. Some great ironing tips that I didn’t know.
LikeLike
Pretty block! Love your fabrics. You provided some great tips. With them, surely everyone’s blocks will turn out the correct size.
LikeLike
Thanks so much for sharing this on Wednesday Wait Loss!
LikeLike
This sunflower block is so pretty! I just love sunflowers! Thanks for the link – AND the tips are great!! Thanks for sharing.
LikeLike
Pingback: Fall Into A QAL Block 4! – Powered by Quilting
This is surely one of your best ever posts Karen, I love your feature on making accurately pieced blocks, especially the fabric preparation and the pressing bits. The one I have really taken note of though is the starting every seam from a scrap or a leader and ender, the number of times I have redone the end of a seam because it was off, and how many have I missed that were off by a smidge? it doesn’t matter how long we have been quilting there is always something new to learn or a new and better way of doing something. I love this post.
LikeLike
Thanks so much for sharing another block! They have all been so neat!
LikeLike
Pingback: Fall Into a Quilt Along Block 4: Sunflower - SandyStar Designs
That’s a very fun block. Thank you for all the helpful tips on maintaining accuracy when piecing. They really do make a difference (when I remember to practice them).
LikeLike
Pingback: Tu-Na Quilts: A Review of Tu-Na’s 2018 Quilting and Blogging Goals | Tu-Na Quilts, Travels, and Eats
Pingback: Tu-Na Quilts: Fall Into a QAL Block Five Released Today | Tu-Na Quilts, Travels, and Eats
Pingback: Fall Into A QAL Block 5: Acorns - Two Ways - Kathleen McMusing
Pingback: Tu-Na Quilts: Fall Into a QAL Block Six Released Today | Tu-Na Quilts, Travels, and Eats
Pingback: Tu-Na Quilts: Fall Into a QAL Block Seven Released Today | Tu-Na Quilts, Travels, and Eats
Pingback: Tu-Na Quilts: Fall Into a QAL Block Eight Released Today | Tu-Na Quilts, Travels, and Eats
Pingback: Tu-Na Quilts: A Postage Stamp Turkey | Tu-Na Quilts, Travels, and Eats
Pingback: Tu-Na Quilts: Fall Into a QAL Block 11 Released Today | Tu-Na Quilts, Travels, and Eats
Pingback: Tu-Na Quilts: Fall into a QAL Block 12 Released Today | Tu-Na Quilts, Travels, and Eats
Pingback: Tu-Na Quilts: Fall Into a QAL Setting Idea | Tu-Na Quilts, Travels, and Eats
Pingback: Tu-Na Quilts: Fall Into a QAL Block 10 – Patchwork Pickles | Tu-Na Quilts, Travels, and Eats
Pingback: Tu-Na Quilts: The Best of 2018 | Tu-Na Quilts, Travels, and Eats
Pingback: Tu-Na Quilts: Sew Let’s QAL Block 3 – Ruler | Tu-Na Quilts, Travels, and Eats
Pingback: Tu-Na Quilts: Destination QAL Block One- Canyon Block | Tu-Na Quilts, Travels, and Eats