
♪ Do you recall the most famous reindeer of all? ♪
If you guessed Rudolph the red nosed reindeer, you are right. Most everyone knows that song. If not, you can listen to it here. But did you know it originally started as a poem and was published by the Montgomery Ward department store? This poem, written by Robert May in 1939, was included in a coloring book and given to children when they came to visit Santa.

Today’s block can be identified just by looking at his nose. This Reindeer Games block was designed by Bobbi at Snowy Days Quilting. You’ll find the link to her free pattern on her blog here. Don’t delay. It’s free only until January 15th.
The tutorial is well written so that even a beginner quilter will be able to understand it and create a beautiful block with ease. The tutorial contains lots of pictures to show you the steps. She’s even included directions for pressing each seam so no guessing involved. Yes, there are lots of pieces with this pattern but the tutorial is written so clearly you should not have any problem.
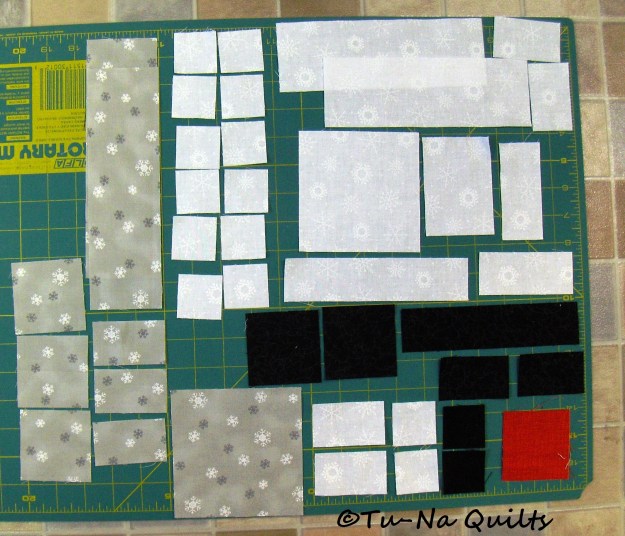
Here’s all the pieces but don’t let that number scare you. It’s easy to put together.
I was grateful that she included what size each unit should be after constructing that unit so that it could be squared. For example: the ear block should be 2.5″ square after flipping those two corners and the nose/cheek unit should measure 3 1/2″ x 8 1/2″ after sewing those HSTs to the nose section. I’ve made enough blocks to know that when working with lots of pieces or with HSTs, that the block can become off very easily and quickly if the seams are not correct. I remember math class teaching that the sum of the parts should equal the whole. Knowing those unit sizes sure helps make that whole block 12.5′ square. Mine came in exactly that size! If you find your units are not measuring correctly, you’ll need to adjust your seams. But she’s got your back covered there too, as her pattern starts out with how to do a seam test and how to adjust your seams.
Here’s a couple of construction tips that I found helpful.
- The pattern is written using the color names of the designer’s block. I found it helpful to define what each of the different colors were and then wrote that on page 2 to help me when choosing my own colors. You might find it helpful to know that:
- Blue is the background of the block
- Brown is the head
- Tan is the antlers
- Red is the nose
- White is the Eye
- Black is the Eyeball

I also checked off the pieces as I cut them.
- Then I read through the whole pattern changing all the color names to reflect my own choice of fabric. I thought this would help make this block easier and speed up the sewing process.

- Since I was using white as a background and my counter top is light colored, drawing those diagonal lines for those HSTs is difficult to see the corners. I laid them on a dark surface (the pattern was handy and provided some contrast) and then it was easier to see those corners.

- Pay attention to the top of page 5. Flipping those corners can be tricky. However, the directions are very clear but I still did it wrong and ended up with one wrong piece.


- I cut the background and head squares 4 1/4″ each instead of the 3 7/8″ as listed on the pattern. These pieces are used on page 7 for the cheeks. Instead of cutting diagonally and sewing a bias edge as given in the tutorial, I made those cute little cheeks like this. First I drew my sewing lines on one of the squares.

I drew a line 1/4″ on each side of a diagonal line from corner to corner. (Shown in red on pic above.) This ruler makes it very handy. If you don’t have it, draw a diagonal line from corner to corner with a ruler. Then draw two more lines, one on each side of that line, 1/4″ inch from that line.
Then with the right sides of the background and head squares together, I sewed on those two seam lines. Then I cut the seam apart with my rotary cutter and ruler from corner to corner. After pressing, I squared them to 3 1/2 ” since they were a bit larger.
I hope I’ve inspired you to grab your fabric and sew up a cute little reindeer today and then let him or her go play with the rest of your blocks.
Giveaway for completing this block
Post a picture on either Snowy Day’s Quilting party link on her blog or on the I Wish You a Merry Quilt-A-Long Facebook page or tag # #iwishyouamerryqal on Instagram to win some prizes. Remember you have until November 6th at 11.59 PM to link or post your pic to be entered to win.

Thank you to RJR Fabrics for offering this fat quarter bundle prize and Beth at Cooking Up Quilts for offering this pattern prize. You can shop her pattern shop here.
Grand Prize Alert
At the end of the QAL there will be a link to download a picture of your finished quilt. To be eligible for the grand prize, you must make a quilt top using all twelve of the QAL blocks by January 16th, 2018. Thank you to all these sponsors for prizes.

Here’s all my blocks so far.
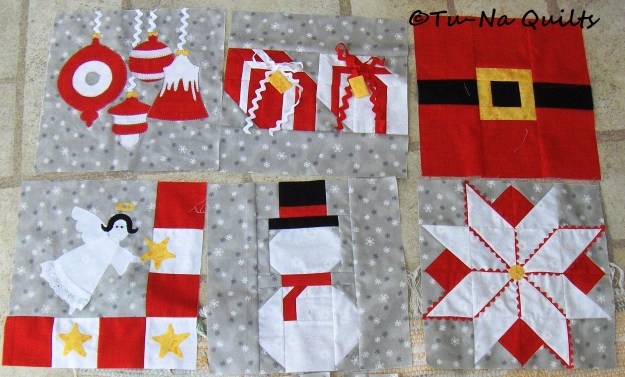


To find info on where to get the patterns, view my blocks, and read some construction tips, check out my links below.
- Block 1 – I am still working on block one. You can find the pattern for block one-snowflake here.
- Block 2 – My block two, tree farm is finished but I haven’t posted about it yet so you will have to be content with the teaser pic. You can find the pattern here.
- Block 3 – Santa’s Belt here
- Block 4 – Christmas Memories (ornaments) here
- Block 5 – Snowman here
- Block 6 – Angel here
- Block 7 – Poinsettia here
- Block 8-Presents here
Meet the rest of the I Wish You a Merry Quilt-A-Long Hosts as they reveal their version of this block
- Pretty Piney
- Sparkle On
- JANDA Bend Quilts
- Snowy Days Quilting Here’s the creative designer behind this ninth block in the I Wish You a Merry Quilt-A-Long. You’ll find the pattern here on her site as well as a full tutorial.
- Cwilt
- The Inquiring Quilter
- Tu-Na Quilts, Travels, and Eats You are here. Thanks for stopping by.
- Slice of Pi Quilts
- SandyStar Designs
- Powered by Quilting
- Quilt in Piece

Block Release Schedule
- Block 10 – November 7, 2017
- Block 11 – November 21, 2017
- Block 12 – December 5, 2017
- Setting Instructions – December 5, 2017
What I Learned Today:
- There are 62 days until Christmas!
- There is so much to do.
- I have not forgotten about the loot from the Quilt MN Shop Hop and my visit to The Quilted Ceiling. Those stories will get written soon.
Question: What interesting fact can you tell about your favorite Christmas song? In 1951, Jay Livingston and Ray Evans were inspired by the tinkling bells of the Salvation army helpers and store Santa’s found in New York City. They wrote a song together and titled it “Tinkle Bell.” Later that day, Jay’s wife quickly told him the slang meaning of tinkle. Jay and Ray changed the word “tinkle” to silver and the title to Silver Bells. If Jay had not showed her his song before he went to the publisher, we’d probably be singing it at potty training time rather than Christmas time.
Thanks for stopping by and do come again.
Karen, Tu-Na Quilts
If you enjoyed this post and would like to read more about my journey or follow me by email, Bloglovin or WordPress, please visit my blog, Tu-Na Quilts, Travels, and Eats.
Linking to:
Block 9 I Wish You a Merry QAL Lindy Party at Snowy Day’s Quilting
Monday Making at Love Laugh Quilt
Main Crush Monday at Cooking Up Quilts
Moving It Forward Monday at Em’s Scrapbag

Pingback: I Wish You a Merry Quilt-A-Long: Block 9 - SandyStar Designs
Hi Karen,
What?! 62 days until Christmas! I really did read your whole post but forgot everything I was going to say once I read that. I’m happy to see a post from you. I don’t like my blogger friends being MIA for too long, so I hope this means things are going well for you. I love the reindeer block! So darn cute, and I love pieced blocks. Your tips will be very helpful, so I will be back to read them again when I’m actually starting. Thanks also for the remaining posting schedule. ~smile~ Roseanne
LikeLike
He is so cute
LikeLike
Your blocks are looking so good together! Nice job.
LikeLike
He turned out so cute. Love the fabric, just finished a quilt yesterday with a layer cake of that line.
LikeLike
I’m so excited! What a fun Rudolph! I can’t wait to start mine:)❤️
LikeLike
Looks Great. I better get to work!
LikeLike
Pingback: I Wish You a Merry QAL Block #9 Release! | Sparkle On
I love your version of the block. Great story about Silver bells! I am still waiting to see the loot, love living vicariously.
LikeLike
I just love your grey Rudolph. Thanks for the great tips, too!
LikeLike
What a great reindeer! Your blocks are so great together. Thanks for that little fact about the Silver Bells song. That was my mother’s favorite secular Christmas song, and so it is also mine.
LikeLike
I think Rudy’s eyes are fine – when you see the whole block he doesn’t look cross-eyed at all.
LikeLike
What a fun block! This is going to be such a cute sampler quilt. Happy stitching this week. (I’m going to ignore your count down to Christmas numbers, I want to stay in denial for as long as possible!)
LikeLike
Pingback: I Wish You A Merry QAL Block 9! – Powered by Quilting
Pingback: Tu-Na Quilts: I Wish You A Merry Quilt-A-Long Block 10 Released Today | Tu-Na Quilts, Travels, and Eats
Pingback: Tu-Na Quilts: Block 2-Tree Farm Finished for I Wish You a Merry Quilt-A-Long | Tu-Na Quilts, Travels, and Eats
Pingback: Tu-Na Quilts: I Wish You a Merry Quilt-A-Long Block 11 Released Today | Tu-Na Quilts, Travels, and Eats
Pingback: Tu-Na Quilts: I Wish You a Merry Quilt-A-Long Block 11 North Star | Tu-Na Quilts, Travels, and Eats
Pingback: I Wish You a Merry QAL Final Block Release #12! | Sparkle On
Pingback: Tu-Na Quilts: I Wish You a Merry Quilt-A-Long Block 12 Released Today | Tu-Na Quilts, Travels, and Eats
Pingback: Tu-Na Quilts: I Wish You a Merry Quilt-A-Long Block One is Finally Done | Tu-Na Quilts, Travels, and Eats
Pingback: Block de Quilt de Caribou - Pattern - CURIOSODAWEB.COM