Finally, we got a cloudy day so I could get some good pics. Otherwise, I’d need a huge sunshade..
Finally, we got a cloudy day so I could get some good pics. Otherwise, I’d need a huge sunshade..

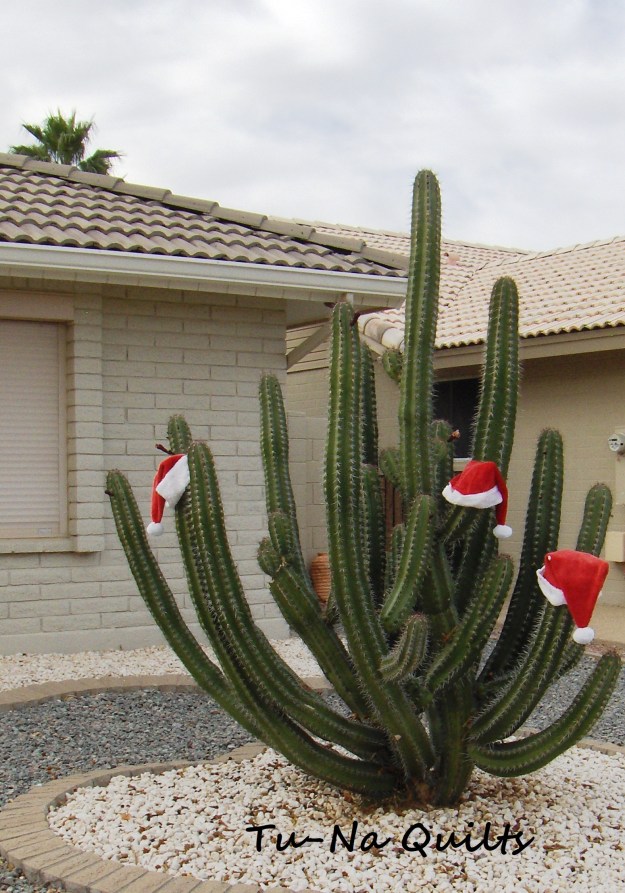
There’s not much for wind around here this time of year. Can you tell?

They have to be careful putting that hat on and taking it off. No need to worry about snow getting on it, though.
Linking to:
Can I Get a Whoop Whoop? at Confessions of a Fabric Addict

This Saguaro needs a little support during this busy time of year but that’s not stopping his Christmas spirit.

This is our little cactus sporting his new hat. He’s about 12 inches tall.
And now it’s beginning to smell a lot like Christmas in my house. Tu-Na Helper is very excited that I’ve started baking.
In fact, there’s lots of sweets being prepared across blogland this week. Today’s list of participating blogs for the Virtual Cookie Exchange is at the end of my post. Thank you Carol of Just Let Me Quilt for arranging another great blog hop.

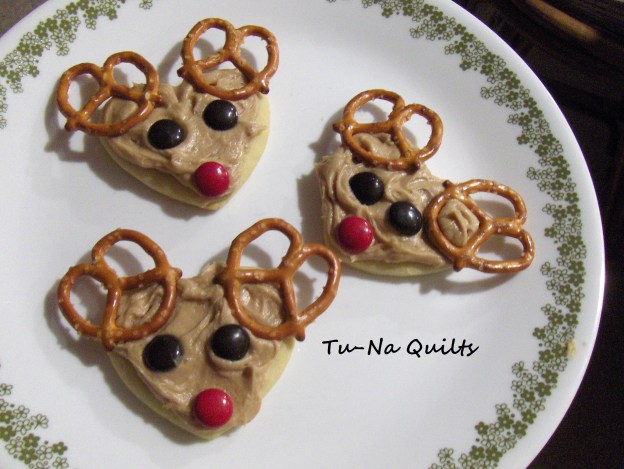
If you guessed Rudolph the red nosed reindeer, you are right. Most everyone knows that song. If not, you can listen to it here. But did you know it originally started as a poem and was published by the Montgomery Ward department store? This poem, written by Robert May in 1939, was included in a coloring book and given to children when they came to visit Santa.

Today’s block can be identified just by looking at his nose. This Reindeer Games block was designed by Bobbi at Snowy Days Quilting. You’ll find the link to her free pattern on her blog here. Don’t delay. It’s free only until January 15th. Continue reading
Welcome to the second block release for today for the I Wish You a Merry Quilt-A-Long. You can find my version of Block Three, Santa’s Belt, here. I’m just getting started and have some catching up to do so come along and join me as we explore some new patterns and blogs together.

Block 4 designed by Jennifer at The Inquiring Quilter
Jennifer’s titled her block “Christmas Memories.” It’s a gorgeous block of Christmas ornaments and you’ll have to pop over to her blog here to get your free copy.
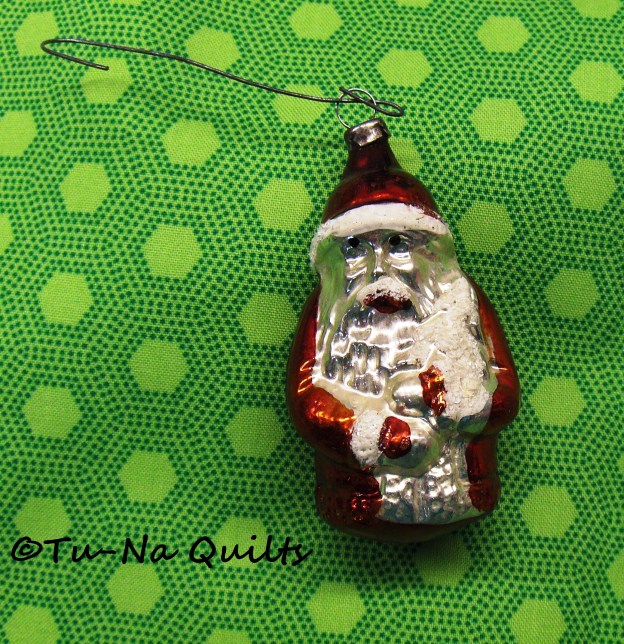
I thought I’d share a memory about two of our tree ornaments. Many years ago, before we had children, my husband and I lived near Washington D.C. We would be spending our first Christmas by ourselves away from our families. I called and asked my mother-in-law to send a favorite tree ornament that would remind my husband of his home and his childhood Christmas memories.

This glass ornament is my husband’s favorite from his childhood. He didn’t know it was coming from his mom.
I also talked to my mom and asked her to mail mine. I had the advantage as I knew just which one.

This multi-faceted ball was made of metal. I’ve since found some plastic types at the dollar store but they are just not the same.

We celebrated that Christmas by ourselves but we still hang these ornaments on our tree every year.
Now onto Jennifer’s block. Here’s as far as I got.

I’ve only had time to pick out the fabrics for this block. Stay tuned while I put it together and post it.
Please see Jennifer’s blog here for the free pattern and tutorial so you can make one, too. I’ll be working on mine and as soon as it’s finished I’ll be posting some tips and tricks to putting this one together here on my blog and also on the I Wish You a Merry Quilt-A-Long Facebook page. It’s the best I can do for now as we have a printer that won’t work and I’ve been very busy petting some new fabric!
Update: I’ve now completed this block and you can see it here. FYI-I only used two of the fabrics above.
Jennifer is offering a 20% discount off all her patterns (PDF or printed) in her online store beginning August 29th and running through September 30th. You must enter the promo code MERRYQAL20 at checkout to get the discount.
Be sure and visit our other designers and hosts to see their version of Jennifer’s block, Christmas Memories.
What I Learned Today:
Question: Do you have a special ornament that you hang on your Christmas tree? I shared mine above. My sister made the nativity out of a walnut shell. I’ll have to post a picture of that when I have my block made as it’s also a favorite of mine.
Coming Soon:
Welcome: I’m glad you stopped by on the quilt-a-long. I hope you’ll be back. If you like what you read and want to make sure you don’t miss any posts, please follow me by subscribing by email, WordPress or Bloglovin.
Thanks for stopping by and do come again.
Karen, Tu-Na Quilts
Linking to:
Midweek Makers at QuiltFabrication
WIPs at Silly Mama Quilts
Let’s Bee Social at Sew Fresh Quilts
Wednesday Wait Loss at The Inquiring Quilter

Have you heard? There’s a new Christmas Quilt-A-Long happening and there’s still time to join.
I’m just getting started myself. I’ve been galavanting all around Minnesota shop hopping and now I’m playing with a bunch of new fabric. I found some Christmas fabric in several of those 66 quilt shops I visited that I can use for this new project, too. I’ll be hosting these designers as they showcase their creative 12.5″ blocks and will be sewing along, too. So grab some fabric and let’s get cutting.
When you’ve finished your block, you might want to join the linky parties going on at the designer’s blogs. If you’re looking for inspiration and want to see what other’s blocks are looking like, check out the I Wish You a Merry Quilt-A-Long Facebook page as well as #iwishyouamerryqal on Instagram.
I’ve heard there are giveaways with prizes. The first two blocks have already been released and are available for free until January 16th, 2018. Find Block One and the tutorial here and Block Two and the tutorial here.
Look for one or two blocks to be released every other Tuesday. Two blocks are on the schedule for today with the fifth block to be released Sept. 12th. The final block is set to post on December 5th giving you just enough time to finish your quilt before Christmas.
I’ll be playing catch-up here so watch for more blocks coming as well as a look at the loot I purchased on the 2017 Quilt MN Shop Hop (on separate posts that is).
Now let’s see what new block awaits us today.
Block 3: Santa’s Belt designed by Laura at Slice of Pi Quilts
Here’s my version. Please see Laura’s site for her free pattern and tutorial so you can make one, too. Thanks, Laura, this is a cute block!
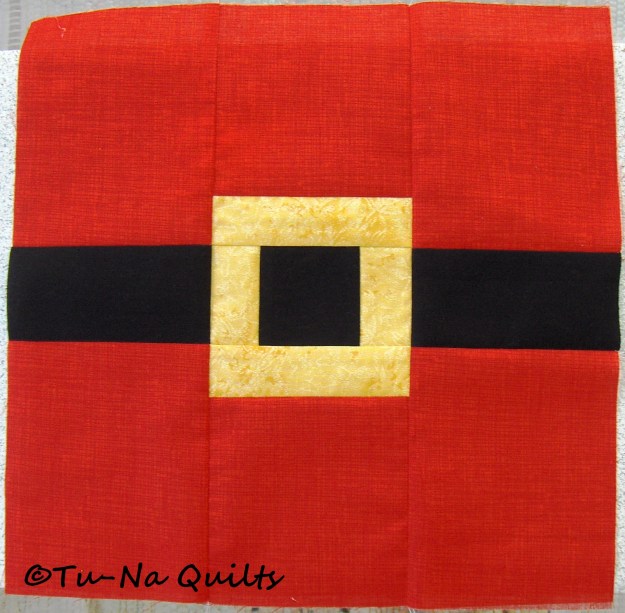
Guess who’s coming to dinner, or to my house, or to your house if you make one of these blocks. Isn’t it amazing how a few strips of fabric placed just so resembles a well-known part of the holidays?
This super cute block sews together very easily. It’s great for a beginner or an advanced quilter who just wants to get a block done quickly. When I sew a block, I like to know which direction to press the seams. So I thought I’d share how I did them.

Press seams in direction of the arrows.
Refer to your pattern found on Laura’s blog. Here’s some pressing hints:
Center Unit: After sewing the gold rectangles to either side of the black square—which will be the center of the buckle, press the seams in towards the black square (as indicated with black arrows in pic above). After sewing the gold rectangles to the top and bottom of that unit, press the seam outwards toward the gold rectangle (as indicated with white arrows in pic above). After sewing the red rectangles to the top and bottom of that unit, press the seam out towards the red rectangles (as indicated with green arrows in pic above). This will help to next the seams when sewing the units together.
Side Units: After sewing the red rectangles on the top and bottom of the black rectangles, press the seams in toward the black rectangles (as indicated with yellow arrows above).
Sewing Units Together: After sewing the units together, press the seams outward (as indicated with purple arrows above).
Your block will now look so pretty from the back but really it will lay flat and your seams will match nicely.
Check out all the designer’s and hosts below to see their version of Santa’s Belt. Will you be joining us and be merrily quilting-a-long?
What I Learned Today:
Question: Does Santa make an appearance at your house? When the kids were young, Santa came and filled their stockings and put presents under the tree. Now, if the grandkids are here on Christmas day, Santa fills a stocking for them—if he remembers. Otherwise, everyone gets presents from Papa and Tu-Na.
Coming soon:
Welcome:
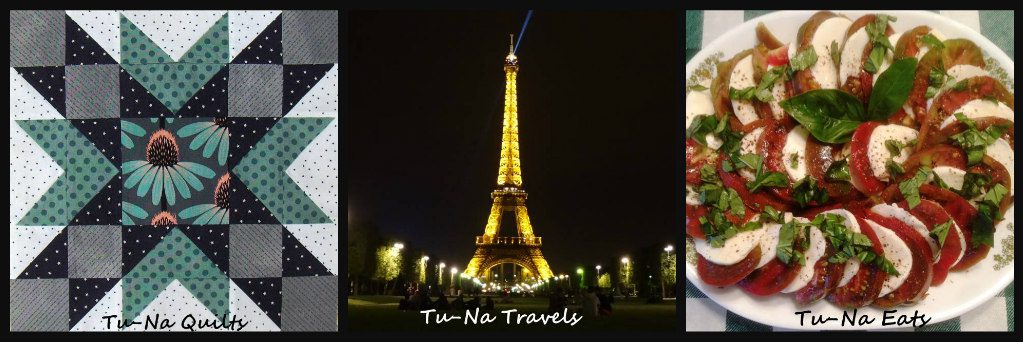
If you are visiting here for the I Wish You a Merry Quilt-A-Long, welcome to my journey doing the things I love: quilt, travel, and eat. You are welcome to follow me by subscribing by email, WordPress, or Bloglovin (check my sidebar for the links).
Thanks for stopping by and do come again.
Karen, Tu-Na Quilts
Linking to:
Wait Loss Wednesday at the Inquiring Quilter
Santa’s Belt Link Up at Slice of Pi Quilts
Let’s Bee Social at Sew Fresh Quilts
Linky Tuesday at Free Motion by the River
WIPs with Friends at Mama Sparks
WIPs at Silly Mama Quilts
Can I Get a Whoop Whoop? at Confessions of a Fabric Addict
Finish or Not Friday at Busy Hands Quilt
Show Off Saturday at SewCanShe

To answer that question, that little quilted stocking actually holds a lot! So far we have:


Let’s see what else it holds.

There’s an itty bitty Pretty Pillow Pincushion. It measures 3.5″. The center pinwheel block is only 1.5″.
I’ve been wanting to try sewing some of those Marvelous Mini Monday blocks from the Temecula Quilt Co. but have been warned that they are tedious and tricky. I decided to prove to myself that I could indeed make them. I chose this pinwheel block (free pattern found here) but didn’t want to sew them into a mini quilt. After some thinking, I decided it would be perfect for a little pillow pincushion similar to the one I’d seen on Crazy Mom Quilts found here.
I didn’t find it difficult at all as long as I paid close attention to cutting accurately and using a scant 1/4″ seam allowance. I think I’ll be making more of these Pretty Pillow Pincushions. Maybe you’d like to make one, too.
Materials Needed:

Directions:
Shorten your stitch length to 1.5. All seams are sewn with a scant 1/4″ unless noted.
Make half square triangles using the squares. With right sides together, place a dark and light square together. Placing my handy little ruler with the line that will connect the points, I drew a diagonal line 1/4″ on each side that line. Do this with the other set. Sew just a tad bit to the left of the line as shown in the pictures below.


See how my stitching line is just on the inside of the drawn lines
Lay your ruler edge across the points, approx. down the middle between the stitching and cut. This will give you two itty bitty blocks. Do this with the other squares.


Press seams open (I always use spray starch when working with small pieces.) Square block by lining up the diagonal line on your ruler over the seam edge and trimming to 1 1/4″.

I think trimming accurately here ensures the block will end up the correct size.
Do this with the other set of squares so you will finish with four itty bitty pieces. Arrange them as in the pattern pictured below and sew the top two blocks together (seam 1 as noted in the picture below). Then sew the bottom two blocks together (seam 2 as noted in the picture below).

Press seams open and then sew the two halves together. Press seam open.


Square your block to 2″. There is your cute itty bitty center for your Pretty Pillow Pincushion.

Add the side borders by sewing right sides together joining seam 1 (as pictured below) first. Press seam toward side. It will go there naturally because of the bulk. Then sew the other side border seam 2 (as pictured below). Press seam toward side.


Now you are ready to sew on the top and bottom border pieces. Sew the top seam (3 as pictured below) onto the top and press towards the side. Sew bottom border (4 as pictured below) and press seam towards the side.

Are you ready for the last border? Sew side seams first (1 then 2) and press seams to the side. Sew on top border (seam 3 as pictured below) and then sew on bottom border (4 as pictured below). Press seams to the side.

Beautiful!

It’s only 4″ square with the center pinwheel only 1.5″. What can I say? I dabble in small pieces. Do you?
Center the top on the batting square. Pin in place.

Lengthen stitch length to 3.0 and quilt as desired. I quilted straight lines about 1/4″ apart in the borders only.

Since this block is so tiny, I only had to sew four rows to quilt it. I did not quilt the center. I figured there was plenty of stitching there already.
Square to 4″.

Iron interfacing onto back side of backing fabric.

The backing extends beyond the interfacing around all sides. This allows me to heat set it without risk of getting the sticky stuff on my ironing board or my iron. An alternative would be covering it with a cloth. Follow the manufacturer directions to heat set it.
Reset stitch length to 1.5. Place top and backing with right sides together and stitch 1/4″ inch around all sides leaving about a 2 inch opening for turning on one side. Backstitch at both ends.

Trim corners at a diagonal. Trim close but not too close.

Trimming off the corners reduces the bulk.
Turn right side out and gently push out corners. I use a knitting needle. Fold seam allowance of opening under and press to aid you when closing the opening.


Fill with crushed walnut shells. I love the crushed walnut shell dispensing bottle I made a.k.a. mustard bottle. I’ve not only used it for all three of these pincushions I’ve made for the blog hop but also for many others. Shake the pillow and tap it up and down on the table to help settle the walnut shells. Use your finger to push them down, too. You want the pillow to be filled full so it is firm. It will settle and soften as you use it. Work to get some into the top corners.


Once it is filled as full as you want, add a bit of poly fiber fil or stuffing to cover the shells exposed at the opening. This helps keep them in the cushion while you sew. Hand sew the opening closed with tiny, close stitches.


This one is almost too cute to stick pins in.


But that’s what it’s for.

The 12 Days of Christmas in July Blog Hop continues:
Sunday, July 23rd, 2017
Bells are Ringing…Silver Bells…Jingle Bells—Day 10 of the 12 Days of Christmas in July Blog Hop
Confessions of a Fabric Addict Today’s assignment is just as I suspected; finishing the final quarter for the Santa’s Trip Around the World Quilt so be prepared for a new assignment tomorrow. Sarah’s also sharing a bunch of ideas for cute. little gifts to give quilters. You may just want to make one of each for yourself, too.
Mel’s Quilting Blog Meloney’s sharing a trio of little gift ideas that are perfect for teachers, or guild members, or neighbors. No one on your list needs to be left crying or looking for a tissue. Go see for yourself.
Resourceful Momma Mel persevered some obstacles to create a cute little project for the hop. She’s even offering it as a free pattern download. Those of you who enjoy embroidery or want to learn, this is your chance to create a cute center block for your wall hanging, table topper, or pillow cover. Who can resist that impish smile?
Cheryl’s Teapots2Quilting If you haven’t come up with an idea or two for Christmas this year, stop by Cheryl’s blog. Her post is filled with suggestions and examples, that should please someone on your list. Make a few extras, just in case you forgot to check it twice!
Remember to leave comments on each of these 12 Days of Christmas in July blog hop posts so you can qualify to win some fabric giveaways of Tula Pink’s new holiday line, Holiday Homies, generously donated by Free Spirit Fabrics!!! You have through July 26th to leave comments on all of the 12 Days of Christmas in July blog hop posts. So hopefully, you’re not too far behind in reading and commenting on them.
Please note: Sarah has notified us that she needs to delay the announcement of winners until August 4th due to a family emergency. Winners will be notified by email then. I will be posting a list, too, as soon as I see it.
Here’s an updated picture of the prizes you could be winning if you are commenting on each of the blog posts.

I posted my 12 Days of Christmas in July blog hop post on Monday, July 14, 2017 where I showed how to make a mini quilted stocking and a ring wreath that kids can make. Click here if you are looking for it. My first stocking stuffer reveal happened here and the second stocking stuffer reveal happened here. Here’s a picture recap of what I’ve created for this hop:


Coming soon on Tu-Na Quilts, Travels, and Eats:
What I Learned Today:
Question: Let’s talk about Christmas yard decorations. How do you decorate the outside of your house or yard or do you enjoy the decorations of others? What’s your favorite outside decoration you’ve seen? My husband hangs lights from the edge of the roof around our gazebo. Then he puts green garland around the rails and ties on pretty red velvet bows. It looks so festive.
We have a street in our town in North Dakota where each year all the houses and trees are lavishly decorated for the holidays. It’s a highlight of the season causing nightly traffic jams as tours cascade down “candy cane lane.” It is beautiful!
However, the residents in our Arizona city decorate their yards quite a bit differently. I posted pics each day from Dec 13-25, 2016 showing these unique Christmas decorations. I also posted pics each day from Dec 26-Jan1 showing how last winter’s weather decorated our North Dakota landscape for the holidays. If you missed any of these, you can find them in the archives on the sidebar, click on December 2016 and scroll through the month. There’s also one on January 1, 2017.
Here’s three of my favorites.


Thanks for all the kind compliments and fun responses to my questions that you’ve shared. I’ve read and appreciated every one. I am just a bit behind in replying. After all, Christmas, even in July, is a hectic season.
Thanks for stopping by and do come again.
Karen, Tu-Na Quilts
Linking to:
