Tag Archives: Online Quilting Bee

Tu-Na Quilts: Three More Poodles Have Come to Play

I’ve been away from home enjoying family time at Pelican Lake in central Minnesota. When I returned home a day ago, our mailbox was stuffed. Needless to say there was a lot of commotion inside.

I rescued Marcel just in time as any longer in there and he would have bitten right through the envelope and escaped (it was half opened)!

tunaquilts 1a

We could hear Marcel while we were driving up to the mailbox. It wasn’t hard to discover who was howling and singing the blues for being cooped up for so long; just look at his background fabric.

Marcel came all the way from England. He was made by Kate who blogs at Smiles from KateHe is indeed handsome and will work well with all the other pups who are starting to gather around here. Kate also included a charm of beautiful fabric that will work its way into some quilt project. Merci, Kate!

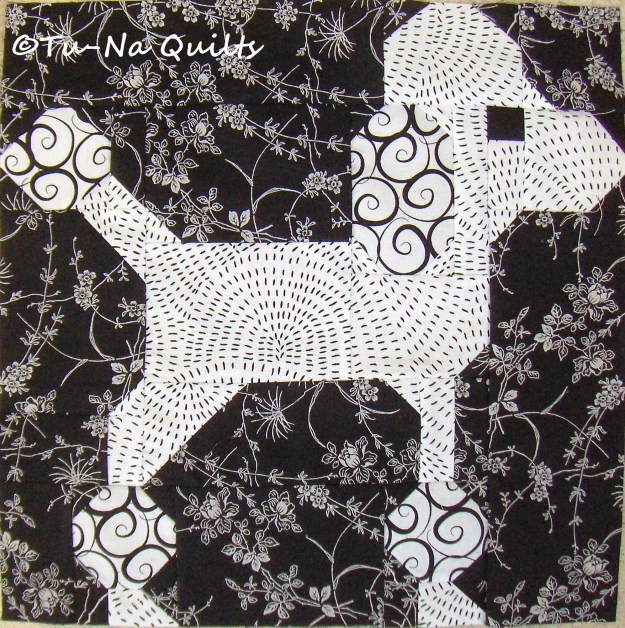
Sue from Australia, who blogs at Sevenoaks Street Quilts, made this adorable Ricky Doodle the Poodle block. Merci, Sue! I’m thinking of doing something special on this quilt with those names that my mates have given to their hard work. It will be subtle but readable.

tunaquilts 4a

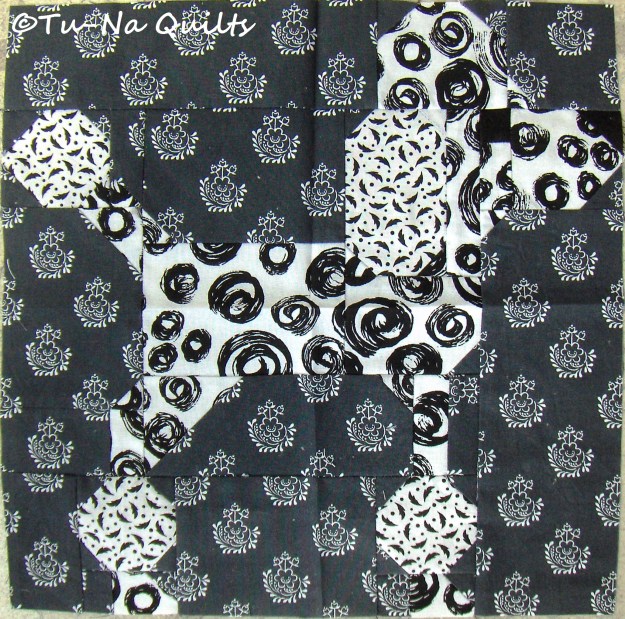
Ricky Doodle the Poodle must be a dog that minds his owner very well as he stayed put inside the envelope even though the taped end was completely open.

Janice from Idaho, who blogs at Color, Creating, and Quilting, made this delightful poodle. I don’t think this one has a name yet. I’m thinking this is a she poodle and needs a fancy French name. Any ideas?

tunaquilts 2a

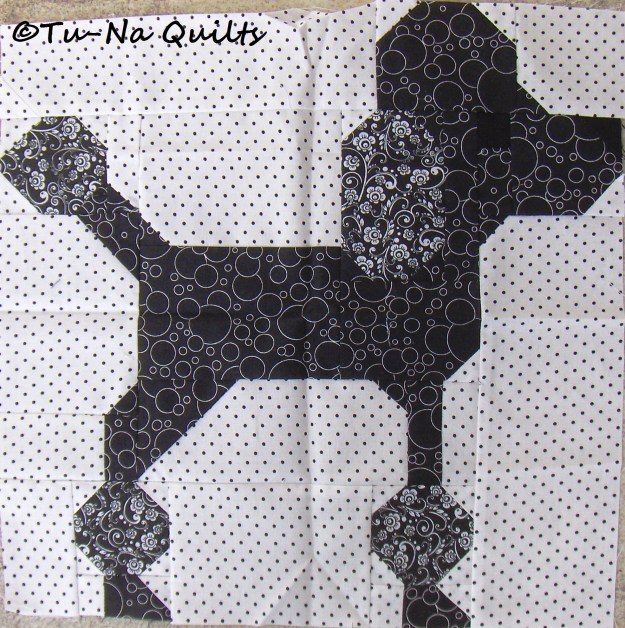
This playful pup was so busy inside the sturdy mailer playing with or guarding all the extra scraps that Janice sent along that she didn’t need to chew through it.

tunaquilts 3a

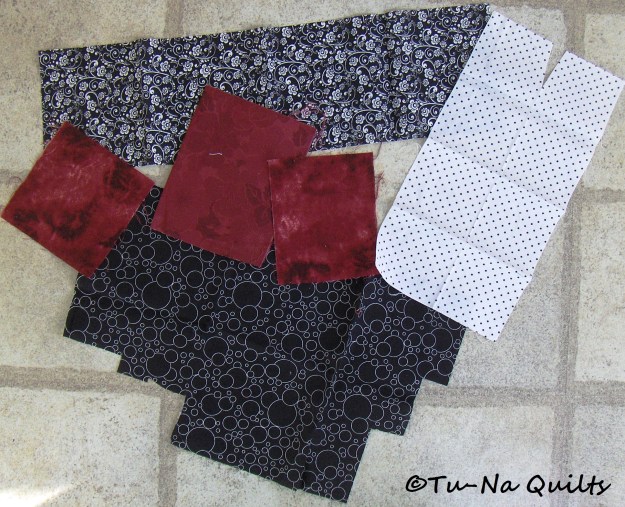
The wine/burgundy pieces will be perfect for cornerstones for this quilt. There’s enough of the black and white ones not only for a 1.5″ square of each for my postage stamp quilt but also for furry accent pieces for more blocks. Merci, Janice!

I won’t be able to ask my other bee group to make these adorable little poodles for me as I had planned. The blocks exceed the cutting/sewing time limit of 1.5 hours for this group. As I look in my crystal ball, I see myself sitting and sewing many more of these but left facing. I suspect I’ll be chain piecing a pack of them so it’s good that I’ve worked the pattern down to doggie science.

I’ve finished putting all the construction tips for this poodle block on the Bee Inspired blog. I hope they were helpful for all my Bee mates and will be helpful for you if you want to make some of these darling poodles for your own. The free pattern for this right facing poodle is available here at The Objects of Design. Sally’s got other block tutorials on her blog, too, located in a tab on her header. If you haven’t visited her, do stop by and see what fabric adventures she and her furry helpers have been up to.

tunaquilts 37a

Meet Cherise, my newest poodle that I made while writing the poodle block construction tips and Paris travel posts. This second block went together much easier and faster than the first one. I still encountered a problem but with some quick surgery and a few new words added to my vocabulary, she was good as new.

I started writing “What I Learned Today” years ago. I shared these Paris trip journal entries on those posts as well as some very interesting photos of sights we saw and food we ate. Here’s the links to all of those posts. You are welcome to stop by and read them.

Tu-Na Travels: Day One in Paris which includes Part un (1): Pattern and Fabric Selection.

Tu-Na Travels: Day Two in Paris and Poodle Block Cutting Tips which includes Part deux (2): Cutting and Anatomy Labeling.

Tu-Na Travels: Day Three in Paris and Prepping Those Furry Pieces which includes Part trois (3): Prepping the Furry Accent Pieces (Foot poofs, Tail, and Ear).

Tu-Na Travels: Day Four in Paris and Prepping the Poodle Body Parts which includes Part quatre (4) Prepping the Poodle Body Parts.

Tu-Na Travels: Day Five in Paris and Prepping the Background Pieces which includes Part Cinq (5) Prepping the Background Pieces.

Tu-Na Travels and Quilts: Day Six in Paris and Building the Frame Around Our Pampered Pooch which includes Part Six (6) Building the Frame Around Our Pampered Pooch.

Tu-Na Travels and Quilts: Day Seven in Paris and Finishing the Leftovers which includes Part Sept (7) Prepping the Last of the Extra Pieces.

Tu-Na Travels and Quilts: Day 8 in Paris and Assembling the Poodle which includes Part Huit (8) Some Assembly Required.

What I Learned Today:

  1. A week at the lake is exhausting.
  2. Coming home is nice.
  3. Coming home to a mailbox filled with fabric already sewn into blocks is even nicer. Thank you, Kate, Sue, and Janice!!! Your hard work and sewing skills are much appreciated. Merci.
  4. My newly college graduated son has been called back for a third interview. We might be empty nesters again.

Question: What’s your favorite vacation activity—skiing or boating or____? My favorite vacation activity is sitting around a campfire with family and toasting marshmallows, making popcorn, or pies. We never did get any pies made on the fire last week as we had so many marshmallows to use: square ones  (these are really a good idea), huge ones (too hard to eat but I gave it my best), regular size, and vegan ones (I never tried these).

Au Revoir,

Karen

Linking to:


Tu-Na Quilts: A Poodle Came to Play

I thought I’d write a quick post to let you all see that I now have a lovely little poodle to play with. Well, actually, Jennifer from The Inquiring Quilter, made me this block for my Bee Month and it arrived on Thursday. She also included three 1.5″ squares of the fabrics she used so I could include them in my postage stamp quilt. Thanks, Jennifer!

tunaquilts 15a

Made by Jennifer at The Inquiring Quilter.


I’ve been busy writing about my trip to Paris and posting construction tips on what’s turning into being a block sew-along this month over at Bee Inspired.  I was in Paris three years ago and had already started writing “What I learned today” posts in my journal. I’m including them to give you my impressions (and sometimes humorous insights) of Paris and the things my husband and I saw, did, and ate. Each post also includes some detailed poodle making tips.

tunaquilts 6a

Here’s the poodle parts all prepped. Labeling makes this project so much easier.


You are all welcome to stop by and read about my Paris adventures and even sew up a poodle or two or more for yourself.  The free pattern is found on The Objects of Design.

Here’s my latest post on Bee Inspired which also includes links to all the Paris and poodle posts. Tu-Na Quilts: Day Four in Paris and Prepping the Poodle Body Parts.

I still have a few more Paris posts left to write as there are still a few parts left before our pampered pooches go parading.

What I Learned Today:

  1. I can “knock out” a post in less than 15 minutes.

Question: Are you a dog or cat person? To me dogs are he’s and cats are she’s except for these poodles; some definitely have he looks and some have she looks.

Linking to: Em’s Scrapbag for Moving It Forward, Monday Making, Katie Mae Quilts BOMs Away, and Main Crush Monday. Design Wall Monday, Tips and Tutorials Tuesday, Linky Tuesday on Freemotion by the River, Wednesday Wait Loss, Can I Get A Whoop Whoop, Finished or Not Friday.

Tu-Na Quilts: The May Bee Blocks Were on Their Way Before Month’s End

May’s Bee blocks were so much fun to make and again were hard to send away as I wanted to keep them for myself. I thought by doing these Bees I would be able to narrow down all the quilts I want to make but instead I’ve lengthened my list.

I may not have made much progress with the elephant quilt this last week as I was busy with cleaning the sewing room and organizing the stash but the May Bee blocks are done and gone. I’ve also made my own block to request from my Bee mates which I will reveal on another post.

6a

This 16″ faux nine patch in a nine patch block went to Irene in North Carolina.


Irene, who is a member of the Bee Inspired Group wanted pale grays or soft gray and white fabrics with no other colors. Yes, that itty bitty 9 patch almost in the center has pieces that finish at 1/2.” The slightly larger 9 patch in the center of the block has pieces that finish at 1.5.” I find it amazing how big 1.5 inch pieces are after working with 1 inch pieces. You can read Irene’s story and get the pattern tutorial here if you’d like to make some for yourself. She’s making this quilt for herself and I also included a little reading material within that block just in case she can’t sleep.

7a

Since it was quite large, I carefully folded it and put it in a small manila envelope. It mailed for 70 cents.

The next block I tackled actually took longer to pick out the fabrics than to sew it. I had pulled so many different fabrics but finally settled on this.

4a

These cats went to Jan in California.


Each cat block is 9 1/2 inches so she asked for two sewn together. I’m glad she did as they look so cute next to each other. Jan’s post and simple tutorial can be found here. The pattern comes from the Missouri Star Quilt Company. If you’d like to make a batch for yourself, you can watch Jenny demonstrate these Pins and Paws Blocks here. Jenny is fun to watch and she makes sewing anything seem so easy.

I put these cats in a legal size envelope but they were overweight so it cost 70 cents to mail with a word of caution from the postal worker that fabric gets caught in their machines. So I’m hoping these little beauties make it safely to California.

Finally, the last block for the month was completed and I had a really hard time sending it off. Luckily for me, I have at least a yard of each of the fabrics and they have been set aside so I can make a stunning star quilt for myself.

1a

Cathy in Montana is the recipient of this beauty.


The pattern and tutorial for this 12 1/2″ unfinished Double Star block can be found here. While it looks complicated and I dreaded doing it for a long time, actually almost all month, it really went together well. I learned a new way to make those flying geese that didn’t waste fabric. I was really leery about that method on the tutorial but it worked really well. I followed Cathy’s advice to  increase the 2 7/8″ pieces that are used for the half-square triangles (the teal dot and navy on my block) to 3″ and trim after sewing. 

Cathy asked us to choose a fabric to fussy cut for the center and then match another fabric for the accent points. She’s hoping for a rainbow of colors. To round out the quilt and to provide some color consistency to it, she asked for navy, white, and gray fabrics and told us where to locate them in the block. I can’t wait to see her quilt as I think it will be stunning. It mailed for 49 cents.

I must admit that when I first pulled that coneflower fabric off the shelf, I thought it to be rather ugly but I needed something that could be fussy cut. So I looked at what I had for the accent and settled on the teal dot. Wow! Now I want to make a whole quilt of teal coneflowers.

Oh, and I have ugly yellow coneflowers with a green background and ugly pink coneflowers with a brownish background. I wonder what I could pair them up with?

What I Learned Today:

  1. There’s always more than one way to solve a problem or make flying geese blocks.
  2. Joining three Bees might have been a mistake as it was supposed to help me narrow down the list of quilts I want to make but has instead increased the list.
  3. Sometimes the things or projects I dread the most actually end up being the best.
  4. I need to be sewing in my sleep or hire someone to sew for me so that I can start and finish making all the quilts I want.
  5. My quilting life is so full of choices, decisions, and endless possibilities.

Question: Have you ever had any difficulty mailing fabric or hearing that it got caught in the postal machines?

Linking to Sew Can She, Monday Making, Em’s Scrapbag, Main Crush Monday and Sew Fresh Quilts. Katie Mae Quilts BOMS Away

Tu-Na Quilts: April Bee Blocks are Done and Mailed

My husband asked me, “Why do you participate in those Bees and then mail away your hard work?” So I thought I’d give you a list of the reasons why I choose to do so. Feel free to add other reasons in the comments sections why you participate, if you do so.

  • It gives me a good opportunity to try out block patterns to see which ones I’d eventually like to include in a future quilt. I can honestly say that most of the blocks I’ve sewn so far are ones that I probably would not have thought to use but now I see that many would make a beautiful quilt.
    13a

    Sherry from Tennessee received this 16 1/2″ block. Those 40 little blue squares were not so little as they started out at 2 1/2″.  She asked us to use any shade of blue including navy and turquoise but limit the use of pastels. I had to ask my mom for some of her blue fabrics to get a nice variety. Sherry’s daughter is getting married and these quilt squares will be part of her wedding quilt.

    You can read more about this quilt here and get the pattern and tutorial here. This envelope cost me 70 cents to mail because it was overweight.

  • I learn new techniques (such as improv when I made Kate’s trees and gnomes block) that I probably would not have tried on my own. Yes, it puts me out of my comfort zone.
  • These Bee blocks allow me to use colors that I’d never put together on my own.
    14a

    Lis from Nebraska asked for Tic Tac Toe using orange, pink and white.  I probably would never have chosen to use those color combinations but it did look really nice when it was done. This block was 12 1/2″ unfinished.

    If you are interested in making some of these Tic Tac Toe Blocks, you can find the pattern here. The postal attendant brought out the slot to check for its size and it didn’t go through. Thus it cost me 98 cents to mail. If you’ve read about my other blocks I’ve mailed each month, you probably agree that there appears to be no rhyme or reason behind the postal rates.

  • I get to “meet” other quilters from all over the world. I’ve shipped blocks to Canada, England, Australia as well as many states in the U.S.
    40a

    Velda from Prince Edward Island in Canada asked for 4 crows for her block. She asked that we not sew them together so she could incorporate our crows along with hers in the quilt. Each little crow block was 6.5″ and really went together well. There were some improv parts such as the beaks. It was a good thing that I had already lifted the lid on my comfort zone box or these crows might have really been a stumbling block.

    41a

    Velda’s got some crazy crows living close by that have been causing her such consternation as they create such a cacophony and conundrum around her house that she decided to embrace the chaos and celebrate them by making an incredible crow quilt. But these are not just your typical crows; they are a colorful bunch.

    You can read Velda’s post here. Free downloadable patterns for birds or crows can be found here or here (this one is paper pieced but could be easily adapted to piecing).

    42a

    Velda graciously volunteered to take my Bee month for April so I thought I’d send her some extra crows. I don’t know what happened as I cut out enough for 8 but as you can count there were 9 when I finished. But I didn’t stop there, I had some fun with these crazy crows and let their personality shine as I named each one and sent Velda a letter introducing them. I will share more about my unruly crows in my next post.

    I put 4 crows in one envelope along with the letter and 5 in the other envelope. Evidently sending mail to Canada is expensive as each envelope was too thick to go through the 1/4″ slot (yes, they were checked), each was overweight (yes they were weighed), and each was leaving the country. Thereby, costing $2.50 to mail each envelope.

  • It allows me an opportunity to improve my sewing skills. I’ve become much better at matching seams and sewing an exact scant 1/4″ seam especially when it gets sent to someone else.
  • I get to participate in something bigger than just making a quilt for myself. I look forward to seeing those blocks I sent to others made into a quilt.
  • It’s fun!

What I Learned Today

  1. I miss those crazy crows. I will have to make some for myself.
  2. I need to sew up the May Bee Blocks early this week.
  3. I will be Queen for one of the Bees next month which means I have to decide on a block pattern, sew one or two blocks, and write a post.
  4. I do have a plan.

Question: What’s got you excited today?

Linking to:

Monday Making and Main Crush Monday. Buttons are on the sidebar, too.

I’m trying a new linky party this week. Show & Tell Monday with Bambi

Tu-Na Quilts: Catching up with the March Bee Blocks and the Continuing Postage Saga

I got a bit behind. Actually, I got a lot behind with making my Bee blocks. I had a family emergency earlier this spring which took me away from quilting and blogging. In fact, I was supposed to be the April Queen Bee for two of the Bees but I didn’t want to take the time to sew up a block and write a blog post. I asked for a volunteer in each of those Bees to take over my month. My hive mates were gracious and understanding. Two hive mates jumped right in and volunteered to post for April and I was assigned a month later this year. By the end of April, I was caught up with all the March and April (coming under a separate post) blocks.

8a

This block is called Checker. It went to Sherry in New Jersey.

Because it was already two weeks into April and this was supposed to have been mailed by the end of March, I decided to make two blocks.  To save on postage, I used a suggestion from one of my readers and wrapped each block in Saran Wrap instead of using a Ziploc bag. I also decided to send each block in its own envelope. It must have worked as each envelope went for 49 cents.

9a

Sherry chose orange and yellow half square triangles, gray rectangles with purple sashing. Yes these are purple. I think this block was 14.5″ square.

This was a fast block to sew. You can find the pattern for Checker here just in case you want to make some too. 

11a

This 14.5″ square block went to Shauna in Texas.

Next up were some star blocks. I made one in pink and the other in purple. Falling behind with making the Bee blocks was so easy to do. However, these star blocks were so fun to make that I made another one as payment for being late (more quilting interest). I packaged each in a separate envelope and they shipped for 49 cents each. Evidently they fit through a 1/4″ slot at the post office allowing them to ship at the regular first class rate.

12a

Shauna asked that we use either a bright pink or a bright purple for the star. I think this quilt is going to look great!


You can find the patterns for these star blocks here or here. I bet you can’t stop with making just two.

The last blocks for March went to Kate in England. I have to admit I was a bit scared to tackle these improv blocks. When I bake, I follow recipes very closely. When I sew, I follow the pattern instructions closely. However, improv blocks allow for creativity and freely cutting without exact dimensions. Eek!! My brain doesn’t do improv.

Kate, who blogs at Smiles from Kate, started her tutorial post with this:  “If you haven’t done any (improv blocks) before you don’t know what you have been missing and the great thing about a Bee is it takes you out of your comfort zone and you never know you may just find your perfect quilting technique.” It did take me out of my comfort zone. I think they came out very nice. I think this quilt is going to look smashing.

30a

These blocks were 15 1/2″ square.


You can find the pattern for these trees and gnomes on Kate’s blog post here or in the original post where she discovered them here.

35a

Kate asked that we make any number of gnomes and trees as long as there were one of each for a total of 6 per block. She says all the bee members made the same number: 4 trees and 2 gnomes (except for my extra block). My original plan was to make one block with 1 gnome and 5 trees and make the other block with 5 gnomes and 1 tree. Well, something happened as I made 7 trees instead of 6. Not wanting to have an orphan block, I adjusted the number of gnomes I needed and came up with this layout. Only after viewing the pictures, did I notice that I had put the gnomes and trees in the same positions in each block leaving the plain blocks in the same location. Talk about my not being able to think outside the box.


I carefully packaged each block and put them in separate envelopes. My husband and I discussed that they might be too thick to fit through the 1/4″ slot if the post office attendant brought it out to test them. In an effort to flatten them, we put a pile of heavy books on top. In the morning, they seemed even thicker than the night before. Sure enough, the envelopes were too thick and it would cost $3.23 per envelope. Upon further questioning we found out that we could save money if they were bundled together. So my husband, who had taken tape along with him to the post office, whipped out the tape and taped the envelopes together. This package now cost $4.16 saving us $2.30.

What I Learned Today:

  1. Sewing an improv block is hard for me to do. Now that I have tried it, I might make more.
  2. The end of the month comes very quickly.
  3. Going to the post office to mail the Bee blocks can be entertaining.
  4. Sometimes, I can’t think outside of the box.

Question: What blocks would you like to try but haven’t yet?

Linking to Can I Get A Whoop Whoop? and Finished or Not Friday. Buttons are on the sidebar.

I’ll be back in a few days with pics and info about the April Bee blocks, You’ll agree that the post is really for the birds.

Karen

Tu-Na Quilts

Tu-Na Quilts: February Bee Blocks and the Postage Saga

February sure went fast! I’ve been busy with entertaining company, baking pies, sightseeing, and beginning my training on my village sewing group’s longarm quilting machine. Imagine my surprise when I looked at the calendar and I found it to be the last day of the month and those bee blocks had not yet been sewn and had to be mailed that very day. I immediately put foot to the pedal (sewing machine one that is) and turned out some real cute ones. I wanted to keep them all but since I left them until the last minute again with no time to sew any others I had to bid them farewell, squash them in their envelopes and give them to my husband to deliver to the post office.

Now here’s where the story gets interesting. If you read last month’s bee block post here, you may remember that I had quite a bit of discrepancy in the postal rates of almost identical size blocks in identical size envelopes (legal envelope) packed the identical way. February’s blocks proved even more interesting.

5aa

This log cabin block went to Colette in Texas. She wanted scrappy logs made with a true red and not an orangey/red. For some reason, I had difficulty finding a true red but with help from Melva ( Melva Loves Scraps) and my mom and cousin, I think I pulled it off. We could use any block for the center that was bright, happy and makes us smile. Tulips make me happy.

I had two blocks ready in their envelopes as my husband rushed out the door shortly after noontime on February 28th to do some errands. I figured I’d have him mail those two just in case I couldn’t get the other one done. He called me after this visit to the post office and had me guess what each cost to mail. “The one to Australia must have been over $5.00,” I said. “I just went up to the attendant and said ‘regular first class mail’ so the one to Texas cost 70 cents and the one to Australia $1.15,” he replied. I stood there with my mouth open. I know it makes no sense at all. But wait. The story isn’t over.

7a

Inside Addition went to Susan in Australia. The pattern was initially written for an 8″ unfinished block but Susan adjusted the pattern to be 13″ unfinished. She wanted this block to be monochromatic using mid to dark tones. Since I work with a limited stash here, I used the best I could find to make it work. I think it turned out well.

While he was gone, I completed the third block and had it ready for him to take out on his errands later in the afternoon. My husband enjoys a challenge, so he took the third envelope that was headed to California to see if he could get it as low as 70 cents again.

6a

Homebase went to Samantha in California. She requested blues or greens for the center.

It almost worked. The attendant initially charged him 70 cents but then decided to see if it fit into a slot. Unfortunately, it was too thick so she charged him 98 cents instead. By now you are probably scratching your head and thinking, how could this be that identical envelopes with approximately the same size blocks could vary so greatly in postage? We are wondering the same thing.

You can find a tutorial for the log cabin here and click printer friendly at the top to display it with pictures. You can find Susan’s adjusted pattern for Inside Addition here on the Bee Inspired Blog. Finally, the pattern for Homebase can be found here. Just in case you want to make some for yourself.

What I Learned Today:

  1. Obviously I didn’t learn my lesson last month; I still waited until the last day to work on my bee blocks. I will try to do better in March.
  2. Instead of thinking of March 31st as the absolute deadline, I am going to give myself March 15th as the deadline for bee blocks but then I’m helping with a bake sale on the 18th so I’ll make the new deadline the 20th.
  3. I get to pick out my block for April for one of the bees so people get to make some for me. But that requires me getting the March block done early for that bee group and sewing a sample block and writing a post about it ahead of time. March is going to be very busy.
  4. Give my husband the bee block envelopes to mail as he gets better rates than I do.
  5. Keep working on  trying to get the envelopes as flat as possible. I have to put the blocks inside a plastic bag inside the envelope. The problem is that I can’t get out all the air and keep it out.

Question: Do you have a postage story? What postal advice do you have for me?

Linking to Love Laugh Quilt for Monday Making and Beth at Cooking Up Quilts for Main Crush Monday (Buttons on the sidebar) and Design Wall at Patchwork Times.