Tag Archives: christmas in July

Tu-Na Quilts: Christmas in July

I have two blog hop posts scheduled this week. If you’re looking for the Fall Into a QAL post, you can find it here.

Welcome to my day on the Christmas in July Blog Hop hosted by Carol at Just Let Me Quilt. Thanks, Carol, for providing us with this wonderful opportunity to be inspired for making or at least thinking about gift giving.

Christmas in July 350

Continue reading

Tu-Na Quilts: The First Reveal—What’s Inside the Stocking?

tunaquilts 63a

It measures 7.5″ wide by 9″ long with an opening of 4.5″ so there’s just enough room to stuff in some quilting goodies.

I posted my tutorial on how to make this cute, easy, Mini Quilted Christmas Stocking on the July 17th 12 Days of Christmas in July post found here on my blog. I included a free pdf pattern for it so you should be able to download and print it to make some for those on your Christmas list or as favors for a Christmas party. I filled this one with some great little goodies that every sewist/quilter needs and would like to receive.

tunaquilts 65a

The first surprise I’ll reveal from it is…….

tunaquilts 28a

This pail pincushion measures 2.25″ tall and has a cute little handle to carry it from one project to another.


Making Your Own Cute Container Pincushion

Materials Needed:

  • small container of your choice
  • scrap of fabric large enough to cut a circle 2 1/2 times the diameter of the top of the container
  • hand quilting thread
  • crushed walnut shells
  • poly fiber fil or stuffing
  • hot glue
  • small block of wood

First: A Little Talk About Some of the Materials

Containers:

I found this pail in a package of 6 at a thrift shop (no surprise there). But I also found other small containers that could be just as cute when turned into pincushions. Other stores to look for containers include dollar stores, hobby and craft stores, and wedding supply places.


tunaquilts 29a

You can get an idea of the size of these containers from those white pails in the back that are 2 and 1/2″ tall and a bit over 2″ in diameter. I think any of these would make a great pincushion container. I would have made a pincushion with that cute little teacup on the left but I couldn’t find where I had stored it when I needed it. You’ll be seeing some more of these container pincushions pop up on my blog from time to time.


Hand quilting thread:

I’ve found when I gather things by hand that this thread is the strongest and won’t break when I pull on it. You can use other thread but be careful when pulling them tight or you will be sewing around that circle again and you will want to make sure it is doubled or more.

Crushed Walnut Shells:

Crushed walnut shells are used in filling pincushions because they help to sharpen the needles and pins. It can be found in a pet store or the pet department of a discount store and is often sold as reptile bedding. Bonus, it’s rather inexpensive and lasts a long time. So you really don’t need to buy the biggest bag unless you make lots and lots of pincushions.

tunaquilts 12a

Crushed walnut shells get everywhere so I recommend laying something on your work surface that you can remove and shake.


To make it easier to fill that pincushion, one could use a paper funnel or other funnel. I made myself a Crushed Walnut Shell Dispensing Bottle.

tunaquilts 13a

To make your own Crushed Walnut Shell Dispensing Bottle, just remove the twist cap off a mustard container. Cut off the tip of the bottle to make the hole larger and then replace the twist cap. To fill the bottle just twist or snap off the cover and fill.


Block of wood

This piece of wood or bead helps to support the pincushion ensuring that it will be sitting pretty above the top of the container just where you want it. You will need to decide what size you will need based on your container and cushion size. If you don’t have scraps of wood just lying around your house, look for another object that you could use: wood bead, bottle or jar cap, or small cardboard box, etc.  

Now let’s get to making this little pail pincushion.

Directions:

Part 1: Making the cushion

Measure the diameter of your container.

tunaquilts 11a

This little pail measures 2 1/8″ in diameter. Taking that times 2.5 yields approx. 5.3″.


Using a pen or pencil, trace a circle that measures about 2 1/2 times the diameter of your container.

tunaquilts 14a

Since I needed a 5.3″ circle, this plate was 5.5″ and worked fine to trace around.


Using a double strand of hand quilting thread, stitch 1/2″ from the edge on the RIGHT side of the fabric circle. Leave at least an 8″ tail at the start. DO NOT KNOT at either end.

tunaquilts 15a

Sewing around the circle on the right side of the fabric will make it easier to pull those threads to gather them. Once you’ve sewn all around the edge, pull on all four threads together to form a bowl shape. You don’t even have to remove your needle from the one end if you are careful. Continue pulling the thread ends until the opening is almost closed.

Fill the little bowl shape with crushed walnut shells, tapping the cushion on the counter or jiggling it in your hand several times to pack it in and to allow the crushed walnut shells to settle into place.

Once you have it almost full, add more. This stuff really settles. Then stuff poly fiber fil into the opening and pack it in tight. I used my purple thang to push it down. and under the stitching. I’ve got a funny story to tell about that purple thang but I’ll save it for tomorrow. And yes, it has to do with Christmas, too.

Pull on all the thread ends to tightly gather into a ball. Tie a knot with the threads. Having a helper hold his finger on the thread as you are tying really helps. Using a needle take the loose thread ends and sew the opening tightly shut.

This slideshow requires JavaScript.

Part 2: Putting it together

tunaquilts 10a

For this part you will need, the container, your fabric ball  you just completed, a block of wood the size you want, and a hot glue gun with glue.


Put a dab of hot glue in the inside bottom of your container and add the block of wood or bead. My block of wood was about 1.25″ tall.

Add hot glue on top of the block of wood and around the inside edge of the container. You’ll need to work fast as hot glue doesn’t stay tacky for very long.

Press the cushion into the container and hold for a few seconds.

tunaquilts 5a

So pretty and useful!

tunaquilts 8a

You could add trim along the top edge if you want. I thought about adding some ric rac but decided not for this one.


12DCIJ2017

Hosted by Sarah at Confessions of a Fabric Addict. July 14, 2017 – July 25, 2017. Gather Christmas gift giving ideas and other holiday inspiration from many bloggers.


The 12 Days of Christmas in July Blog Hop continues. Here’s what’s going on today:

 Wednesday, July 19th, 2017

Do You Hear What I Hear? Day Six of the 12 Days of Christmas in July Blog Hop

Confessions of a Fabric Addict  Sarah’s got us sewing the next step on our quilt along.

cfa

It’s not too late to start your Santa’s Trip Around the World Quilt. Check out Sarah’s blog above for directions.


 The Colorful Fabriholic Jan found the perfect solution for those of us with limited space but still having a desire to put up a Christmas tree. Making one of these is definitely on my list to do.

Smiles From Kate  Kate’s drawn some cute holiday pillow covers that can stay around longer than just Christmas. Even if the weather warms and you haven’t put them away, they won’t be melting anything except maybe your heart.

Remember to leave comments on each of their 12 Days of Christmas in July blog hop posts so you can qualify to win some fabric giveaways of Tula Pink’s new holiday line, Holiday Homies, generously donated by Free Spirit Fabrics!!! You have through July 26th to leave comments.

giveaway

Coming soon on Tu-Na Quilts, Travels, and Eats:

  • Friday, July 21st, 2017Tu-Na Quilts: The Second Stocking Stuffer Reveal—You Mean There’s More?
  • Sunday, July 23rd, 2017Tu-Na Quilts: The Third Stocking Stuffer Reveal—How Much Can It Hold?
  • Tuesday, July 25th, 2017Tu-Na Quilts: The Fourth and Final Stocking Stuffers Reveal—Does The Fun Have to End?

What I Leaned Today:

  1. DVRs are very helpful, especially the rewind button. 
  2. This summer seems to be going exceptionally fast.
  3. Once a mom, always a mom. Our “baby” and our first born (and his wife) headed out for a trip in the Boundary Waters. I hope they have fun but I will still worry.

Question: What is your favorite holiday beverage to make, serve, or drink? Since we make our own apple cider in the fall, we usually thaw out several gallons and serve it chilled or heated with cinnamon sticks and slices of oranges and serve it hot.

Thanks for stopping by and do come again.

Karen, Tu-Na Quilts

Linking to:

Tu-Na Quilts: On the Fourth Day of Christmas, My True Love Gave to Me…

tunaquilts 1a

Yes, he gave me a red rose which he picked from the flower bed.

Welcome to the fourth day of the 12 Days of Christmas in July Blog Hop.


Confessions Of A Fabric Addict

You will find links to all the participating blogs at the very end of my post after the question. Thank you, Sarah, for coordinating this event. You might like to visit her blog, Confessions of a Fabric Addict, each day for her Christmas Quilt Along as well as enter daily to win prizes. Yes, there’s a giveaway going on with 12 daily and one grand prize. To enter, you must comment on each participating blog on their 12 Days of Christmas in July post AND also on Sarah’s blog. You have through July 26th to get all your reading and commenting finished. The list of participating blogs is at the end of my post.

Every year, Christmas sneaks up on me so I thought I’d get an early start this year. I have several ideas to share with you today. First, I’ll show you how I sewed this stocking which can be a fun gift for someone on your list or for a favor at your quilting guild.

tunaquilts 64a

The stocking is now filled with some fun but useful surprises which every sewist would like to have. Check back on Wednesday the 19th, Friday the 21st, Sunday the 23rd, and Tuesday the 25th as I reveal a new stocking stuffer and show you how to make them, too. To make sure you don’t miss out on any of that fun or any of the other things happening in my little quilting corner of the world, just follow my blog (check my sidebar to find buttons to follow by email, WordPress, or Bloglovin).

Next, I will also share with you this fun Christmas wreath project that I enlisted the help of some of my grandchildren while we were at the lake over the 4th of July. 

tunaquilts 8a

Finally, I’m also including some helpful hints when working with children.

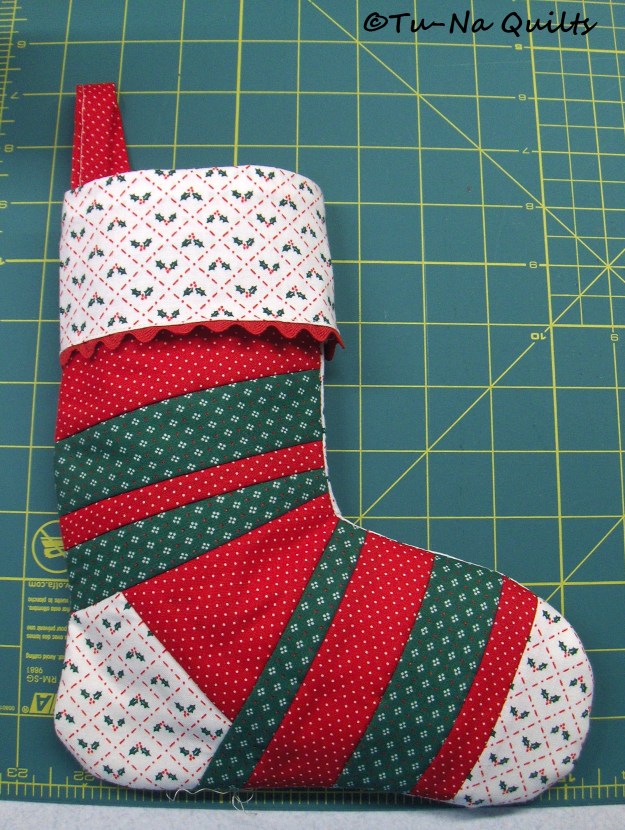
Part One: Let’s Make an Easy Mini Quilted Christmas Stocking

What you will need:

  • one fat quarter of fabric (after cutting out your stocking using the pattern, cut out a 4″ square for the heel, a 2.5″ x 4″ strip for the toe, and a 6″ x 10″ strip for the cuff) These can all be the same fabrics or other fabrics if you want the scrappy look.
  • fabric strips in a variety of widths 1″- 2″ wide and at least 7 inches long that have straight edges. You will need one 3″ x 5.5″ strip that goes from the heel piece to the right edge. You will need one 2.5″ x 6″ strip for the loop.
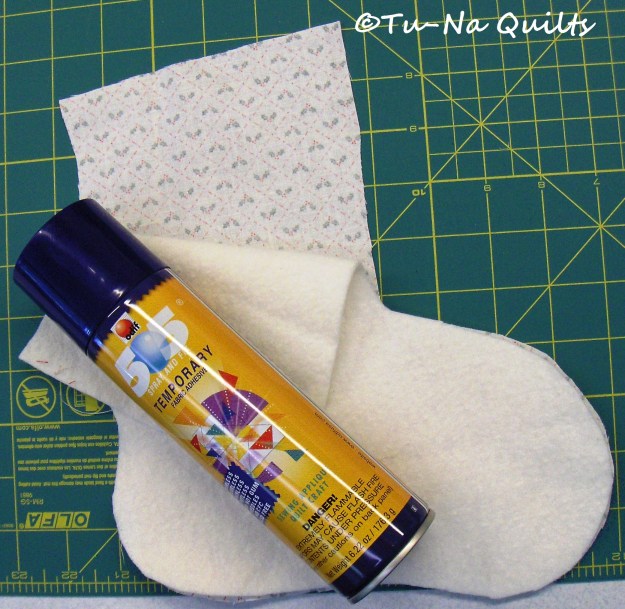
  • one 10″ x 12″ piece of batting
  • fabric basting spray or fabric glue or pins
  • trim for the cuff, optional (pom poms, ric rac, etc.)
  • free stocking pattern that I drew and can be downloaded as a pdf and printed from here stocking pattern

Directions:

Cut out the paper pattern pieces matching the As and the Bs. For pattern accuracy, cut along the inside of the black line. Tape the top of the stocking onto the bottom piece.

tunaquilts 26a

Take note of where the black dots are for heel placement.


Placing the right side of the pattern onto the wrong side of the fabric, cut out the stocking. This will be the backing for the top and also becomes the inside of the stocking. Cut out another one for the back of the stocking. You need both to be facing that same direction and cut from the wrong side of the fabric.

tunaquilts 27aa

You will need to do this two times each this same way.


Placing the right side of the pattern onto the batting fabric, cut out the stocking shape.

tunaquilts 29a

Spray baste the batting onto the wrong side of the backing. You could use fabric glue in a couple of places around each edge if you’d rather. Another alternative is to pin baste the pieces together, taking care to remove the pins BEFORE you sew the strips over them.

tunaquilts 30a

Place the 4″ heel square of fabric right side up on the batting matching the dots. Either spray, glue, or pin in place.

tunaquilts 31a

With right sides together, position a 3″ strip of fabric on the right side of the heel fabric at an angle. This will cover the stocking area from the heel to the right side of the stocking.

tunaquilts 32aa

Sew 1/4″. Trim if needed, Flip and press lightly but don’t press the batting directly as I found mine would shrink a lot. 

tunaquilts 33a

I’ve sized the pieces large so you will have some trimming to do.


Start adding strips beneath the heel piece. Sew 1/4″. Trim if needed. Flip and press.

tunaquilts 35a

When laying the first strip down, put it at the angle you want it to be making sure you catch all the fabric below it in the seam allowance.


Keep doing this until you get about 1.5-2″ from the edge of toe.

Add the toe piece.

tunaquilts 47a

Continue adding rows above the heel all the way to the top. Adjust the angles of the strips if needed. The top strip doesn’t have to align with the fabric on its underside. Just make sure you are catching the lower fabric in the seam allowance. Trim seam, press, flip, and continue all the way to the top.

Turn over stocking and use the backing as a guide to trim the front pieces.

With right sides together, pin back onto quilted front.

tunaquilts 44a

Sew 1/2″ all along the sides and bottom but NOT the top edge. Zig zag raw edges or use a serger to join the pieces. Clip the two inner curves.

tunaquilts 45a

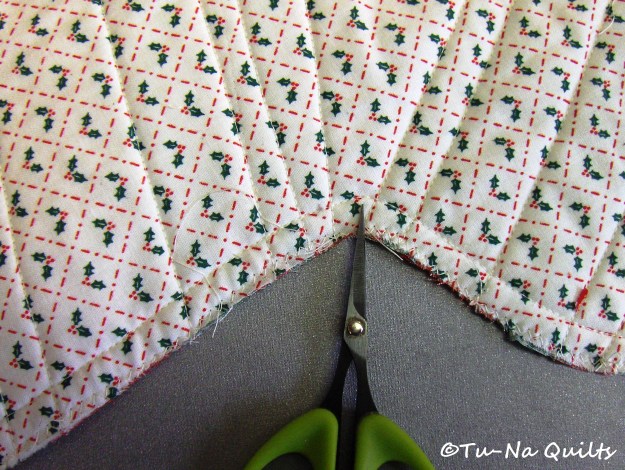
Clip the two inner curves as noted on the pattern. Clip close to the seam but not too close.


Turn right side out rounding out the heel and toes parts with your hand or blunt object.

tunaquilts 46a

There it is all turned right side out. Look how it puffs up just waiting to be filled with goodies!


The Hanging Loop:

Fold the 2.5″ x 6″ piece in half lengthwise and press. Unfold and take each side and fold it to meet the middle crease. Press the outside edges. 

Now bring both halves together and press. After pressing, sew close to the edge.

tunaquilts 51a

Fold loop in half and stitch across raw ends to secure them in place. This is tricky and they want to stray, just take it slow and it will go.

tunaquilts 53a

I find adding this little row of stitching just above those raw edges on the ends really helps keep the loop aligned as I do the next step.


Pin or glue baste the loop in place at the top inside of the stocking next to the left side seam on the back making the raw edges meet. The loop should be pointing down inside the stocking. Secure with a line or two of stitching about 1/4″ from the edge.

Cuff:

Fold the cuff in half with the short edges together and stitch a 1/2″ seam.

tunaquilts 56a

 Press seam to side and fold in half with wrong sides together to form a circle. Press so cuff seam is in the middle of the back.

Pin cuff inside the stocking matching the top edge. The pressed cuff seams will match with the stocking seams.

tunaquilts 59a

Sew a 1/2″ seam and zig zag or serge. Turn cuff right side out.

tunaquilts 60a

Add some trim if you like. Pom poms would be nice. I sewed ric rac along the bottom edge. I’ve always liked ric rac. Do you?


Isn’t it cute!

tunaquilts 63a

This stocking is 7.5″ wide and 9″ long with a 4.5″ opening.


This stocking is stuffed! Come back on Wednesday, as I begin to reveal the first of many surprises it holds.

tunaquilts 65a

Part Two: So the Kids Want to Make Something, too!

Child’s Project: Ring Wreath

tunaquilts 8a

Here’s the one I made. Well, I am young at heart. Does that count?


What you will need:

  • Metal canning jar rings (I used the regular size)

    Since my jar rings were rather rusty, my husband spray painted them ahead of time for me. He was being a very helpful Tu-Na helper.

  • Fabric cut into 3/4″ x 6″ strips (I used 30 for my ring but the kids used less.)
    tunaquilts 16a

    Although I brought my rotary cutter and a small mat along to the lake, I forgot the ruler. It was then impossible for me to cut them into straight strips, so I just eyeballed them and cut them with a scissors.
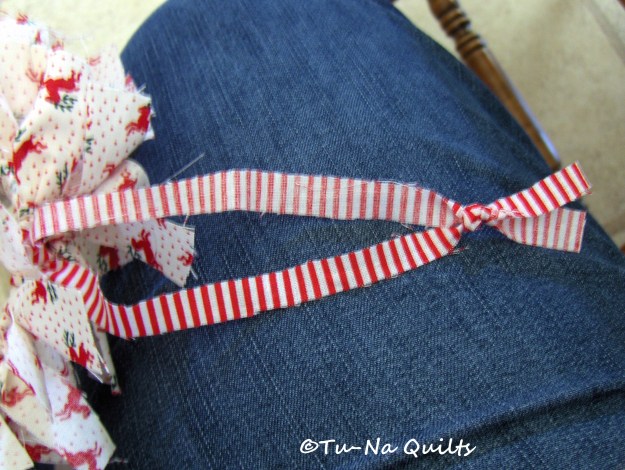
    One fabric string cut 1/4″ x 16″ for the hanging loop or you could use twine, string, yarn, or jute.

Directions:

Show your little ones how to tie a fabric strip around the ring and pull it tight. Keep adding strips, pushing them tightly against the previously tied one.

tunaquilts 10a

tunaquilts 12a

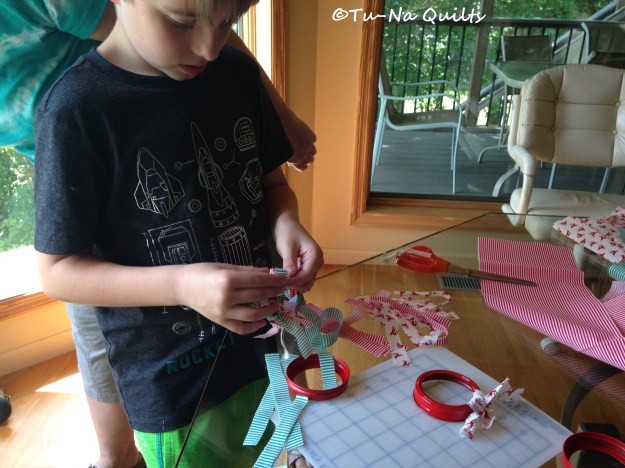
Here’s my 8 year old grandson working on his.

tunaquilts 3a

After about 1/4 done around the ring, he was ready for a break.


tunaquilts 15a

My two year old grandson picked out the reindeer strips and handed them to me to tie.


tunaquilts 17a

The little ones also just wrapped the strips around the rings. But that’s ok, they had fun and later their mommies finished the rings for themselves.


tunaquilts 11a

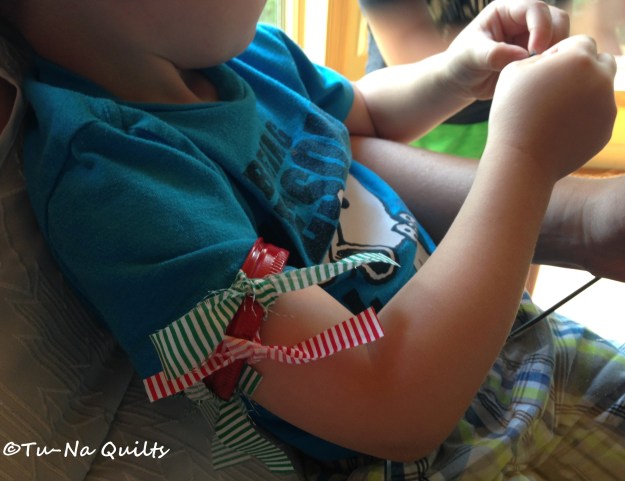
Sometimes they were worn as arm bands.


When the ring is filled, push aside a couple of ties so you can tie the 1/4″ x 16″ strip (or string) around the ring for the hanging loop.

Then add a second knot further up creating the loop.

tunaquilts 25a

tunaquilts 6a

“Ah, mommy, yours is so nice.”


tunaquilts 5a

“But I think I like it better as an arm band. Hey, mom, look at my new fit bit.”


tunaquilts 7a

Part Three: How You and Your Children Can Enjoy Making Crafts Together:

  • Make sure your project is appropriate for the age of your child. If it’s too difficult they may become frustrated. If it’s too easy they may lose interest.
  • Break up the process into small sessions. Young children lose attention quickly. Let them come back to work on the project later.
  • Don’t expect perfection.
  • Show how but don’t take over. It may look very different from what you imagined.
  • If the project is a bit too hard, think of things your child can do to help you.
  • Be encouraging and offer praise.
  • Most of all, have fun together.tunaquilts 13a

What I Learned Today:

  1. It doesn’t matter if Christmas comes in December or July, it still catches me by surprise.
  2. Having a summer cold is miserable. I am on week three. Maybe it’s time to visit the doctor.

Question: What gifts do you want to sew this year? I’ve got to sew an apron for sure. My mother-in-law has been asking for one for a couple of years.

Confessions Of A Fabric Addict

Here are the blogs participating in the 12 Days of Christmas in July blog hop!

 Friday, July 14th, 2017 

The 12 Days of Christmas in July Has Arrived—Day One

Confessions of a Fabric Addict

 From My Carolina Home

Vrooman’s Quilts

Pampered Pettit

Saturday, July 15th

We Need a Little Christmas—Day Two

Confessions of a Fabric Addict

Citymousequilter

Vicki’s Crafts and Quilting

Quilting Fun

 Sunday, July 16th

Go Tell It on the Mountain—Day Three

Confessions of a Fabric Addict

Swimming in a Sea of Estrogen

Everyone Deserves a Quilt

Cheryl’s Teapots2Quilting

Monday, July 17th

Deck the Halls–It’s Day Four of the 12 Days of Christmas in July Blog Hop

Confessions of a Fabric Addict Sarah gives us another sewing assignment just like the others. She’s found some great looking origami ornaments to show us and we can make them too.

Tu-Na Quilts, Travels, and Eats (Thanks for visiting me on the hop.)

Pieceful Thoughts of My Quilting Life Wendy adds a colorful touch to the holidays by showing how to color some holiday cheer with the children. You’ll be running for your box of crayons after reading this.

Crayon Box Quilt Studio Michele made a Christmas quilt. She shows how using charms, half charms, and sashing can make a beautiful quilt for anytime of the year. Look closely at the pics to see some design inspiration in her quilting.

 Tuesday, July 18th

Confessions of a Fabric Addict

Seams To Be Sew

Stitchin at Home

Domestic Felicity

 Wednesday, July 19th

Confessions of a Fabric Addict

 The Colorful Fabriholic

Smiles From Kate

 Thursday, July 20th

Confessions of a Fabric Addict

 Cheryl’s Teapots2Quilting

The Inquiring Quilter

Selina Quilts

 Friday, July 21st

Confessions of a Fabric Addict

 Katie Mae Quilts

Quilted Blooms

QuiltFabrication

Saturday, July 22nd

Confessions of a Fabric Addict

Devoted Quilter

Kathy’s Kwilts and More

All Points of the Compass

 Sunday, July 23rd

Confessions of a Fabric Addict

Mel’s Quilting Blog

Resourceful Momma

Cheryl’s Teapots2Quilting

 Monday, July 24th

Confessions of a Fabric Addict

 Anja Quilts

PickingandStitching

A Dream and a Stitch

 Tuesday, July 25th

Confessions of a Fabric Addict

 Christina’s Handicrafts

Abyquilts

Thanks for stopping by and do come again.

Karen, Tu-Na Quilts

Linking to

Tu-Na Quilts: Go Tell It On the Mountain–Day Three of 12 Days of Christmas in July Blog Hop

12DCIJ2017

This year’s hop started July 14, 2017 and will continue through July 25, 2017. Participating bloggers are posting gift and Christmas ideas.

Santa’s little helpers for today can be found at:

 Sunday, July 16th, 2017

Confessions of a Fabric Addict Sarah gives us our sewing assignment for Santa’s Trip Around the World quilt and also shows some great decorating and gift ideas that you could make for someone on your list. Are you sewing along? I’ll show my pics soon.

cfa

  Swimming in a Sea of Estrogen Amy won’t be burning her fingers this year when she pulls hot bowls out of the microwave. If you’ve been wanting to make yourself or someone on your Christmas list some microwave bowl cozies or if you have no idea what these are, you’ll want to hop right on over to her blog to see how really easy and fast these are to stitch.

Everyone Deserves a Quilt  Do you set up a Christmas tree? Joanne’s got you covered if you do. Well, your tree that is. She has a tutorial for a tree skirt that looks mighty festive. You might want to check it out.

Cheryl’s Teapots2Quilting  If you haven’t found anything to make for those on your list yet, don’t worry, Cheryl’s posting lots of ideas with more to follow. She’s also giving away three mini kits so  you might like to leave a comment on her blog if you want to win one and really get a jump on  your holiday making.

Remember to leave comments on each of their posts so you can qualify to win some fabric giveaways of Tula Pink’s new holiday line, Holiday Homies, generously donated by Free Spirit Fabrics!!! You have until July 26th to comment on each blog.

giveaway

See my post here for a complete listing of all participating blogs on the hop.

What I Learned Today:

  1. There’s no place like home. Even my junk doesn’t want to leave. (I’m cleaning out my storage room and garage.)
  2. It’s hard to let go of things I’ve had for many years.
  3. I’m very sentimental.

Question: What do you make/bake for Christmas goodies? I used to make lots of different kinds of cookies and candy which is one of the reasons I am once again on a mission to lose weight. Now, I’m lucky if I get our Traditional Painted Cookies, Reindeer Cookies, and maybe some gingerbread men made for the grandkids.

Thanks for stopping by and do come again.

Karen, Tu-Na Quilts


Tu-Na Quilts: We Need a Little Christmas–Day Two of the 12 Days in Christmas in July Blog Hop

12DCIJ2017

This year’s hop is hosted by Sarah at Confessions of a Fabric Addict.


Today’s merry elves can be found here:

 Saturday, July 15th, 2017

Confessions of a Fabric Addict Sarah continues giving instructions for her quilt along with this quilt. Yesterday, we chose our fabric and cut strips. Today, we’ll be doing some sewing of long strips. It’s not too late to get started.

cfa

 Citymousequilter Grace won’t be left without a sock—to hang on the mantel at Christmas time that is. See how she constructs a string-pieced stocking both with and without a cuff.

Vicki’s Crafts and Quilting Vicki shows a new pattern she just released on the Craftsy site. If you want to make a fun table runner with snowmen dudes, check out her blog. She has a link to the pattern. It sure looks like fun!

Quilting Fun Pam makes a quilt and gives a couple good tips (what she uses to make a circle and how she does the center of the circle) as she quilts a circular pattern around her quilt. I thank you for them!

Remember to leave comments on each of their posts so you can qualify to win some giveaways of fabric of Tula Pink’s new holiday line, Holiday Homies!!!

giveaway

See my post here for a complete listing of all the blogs on the hop.

What I Learned Today:

  1. If at first I don’t succeed, try again, and again, and again.
  2. Persistence paid off, I succeeded. You’ll see later.
  3. July is almost half over. Yikes, there’s so much to do before the month ends. We are in a major clean-out of our storage room and garage.
  4. I am already behind with this quilt along and it’s only day 2.
  5. Thirteen days until the 2017 Quilt Minnesota Shop Hop begins. Will Tu-Na and Tu-Na helper go this year or sit this one out?

Question: What is your favorite Christmas tune? Mine is “It Came Upon a Midnight Clear.”

Tu-Na Quilts: Christmas in July Has Arrived-Day One

12DCIJ2017

This year’s blog hop is hosted by Sarah at Confessions of a Fabric Addict.

Today’s participants can be found here and they are offering:

Friday, July 14th

Confessions of a Fabric Addict (she posts at 12:01 AM Central time) Sarah will be offering a quilt-along during these 12 days. Her post gives fabric requirements and cutting instructions. I hope you will join along as we sew our way through the rest of July. If you can’t participate now, remember this quick, easy tutorial when you need a quilt pieced NOW.

From My Carolina Home Carole makes sewing a zippered bag look easy. She offers the free tutorial and gives directions and pictures. Take it one step at a time and you’ll soon have one (maybe more if you can’t stop making these) gift made for someone on your list.

Vrooman’s Quilts If you have kids or grandkids, you might like to see these ornaments out of CDs that the kids can make. Jump start the little ones creativity, today!

Pampered Pettit  Are your pillows looking tired and worn? Breathe new life into them with Brandy’s quick pillow sham/covering tutorial. You could also make new covers for your existing pillows in pretty holiday fabrics and add some holiday cheer to your sofa/couch.

Remember to comment on each of the blogs above to qualify for some big fabric giveaways. If you need more info about the giveaways, see my post here.

What I Learned Today:

  1. “A good joke beats a pill for a lot of ailments.” Emery Styron (as quoted in an old Ann Landers column I found while cleaning off my desk)
  2. If I need to get something done, don’t expect someone else to do it especially when no one else is around.
  3. My son is very helpful. It will be sad to see him move out. No job offer yet but there is hope.
  4. Writing a post takes up a lot of time that I could be using finishing up my projects. I am not sure I will post every day, but I thought I’d at least get this hop started out and let you know the variety of things being offered.

Question: If Christmas really came in July, how different would your celebration be?

Thanks for stopping by and do come again.

Karen, Tu-Na Quilts