
Yes, he gave me a red rose which he picked from the flower bed.
Welcome to the fourth day of the 12 Days of Christmas in July Blog Hop.

You will find links to all the participating blogs at the very end of my post after the question. Thank you, Sarah, for coordinating this event. You might like to visit her blog, Confessions of a Fabric Addict, each day for her Christmas Quilt Along as well as enter daily to win prizes. Yes, there’s a giveaway going on with 12 daily and one grand prize. To enter, you must comment on each participating blog on their 12 Days of Christmas in July post AND also on Sarah’s blog. You have through July 26th to get all your reading and commenting finished. The list of participating blogs is at the end of my post.
Every year, Christmas sneaks up on me so I thought I’d get an early start this year. I have several ideas to share with you today. First, I’ll show you how I sewed this stocking which can be a fun gift for someone on your list or for a favor at your quilting guild.

The stocking is now filled with some fun but useful surprises which every sewist would like to have. Check back on Wednesday the 19th, Friday the 21st, Sunday the 23rd, and Tuesday the 25th as I reveal a new stocking stuffer and show you how to make them, too. To make sure you don’t miss out on any of that fun or any of the other things happening in my little quilting corner of the world, just follow my blog (check my sidebar to find buttons to follow by email, WordPress, or Bloglovin).
Next, I will also share with you this fun Christmas wreath project that I enlisted the help of some of my grandchildren while we were at the lake over the 4th of July.

Finally, I’m also including some helpful hints when working with children.
Part One: Let’s Make an Easy Mini Quilted Christmas Stocking
What you will need:
- one fat quarter of fabric (after cutting out your stocking using the pattern, cut out a 4″ square for the heel, a 2.5″ x 4″ strip for the toe, and a 6″ x 10″ strip for the cuff) These can all be the same fabrics or other fabrics if you want the scrappy look.
- fabric strips in a variety of widths 1″- 2″ wide and at least 7 inches long that have straight edges. You will need one 3″ x 5.5″ strip that goes from the heel piece to the right edge. You will need one 2.5″ x 6″ strip for the loop.
- one 10″ x 12″ piece of batting
- fabric basting spray or fabric glue or pins
- trim for the cuff, optional (pom poms, ric rac, etc.)
- free stocking pattern that I drew and can be downloaded as a pdf and printed from here stocking pattern
Directions:
Cut out the paper pattern pieces matching the As and the Bs. For pattern accuracy, cut along the inside of the black line. Tape the top of the stocking onto the bottom piece.

Take note of where the black dots are for heel placement.
Placing the right side of the pattern onto the wrong side of the fabric, cut out the stocking. This will be the backing for the top and also becomes the inside of the stocking. Cut out another one for the back of the stocking. You need both to be facing that same direction and cut from the wrong side of the fabric.

You will need to do this two times each this same way.
Placing the right side of the pattern onto the batting fabric, cut out the stocking shape.

Spray baste the batting onto the wrong side of the backing. You could use fabric glue in a couple of places around each edge if you’d rather. Another alternative is to pin baste the pieces together, taking care to remove the pins BEFORE you sew the strips over them.
Place the 4″ heel square of fabric right side up on the batting matching the dots. Either spray, glue, or pin in place.

With right sides together, position a 3″ strip of fabric on the right side of the heel fabric at an angle. This will cover the stocking area from the heel to the right side of the stocking.

Sew 1/4″. Trim if needed, Flip and press lightly but don’t press the batting directly as I found mine would shrink a lot.

I’ve sized the pieces large so you will have some trimming to do.
Start adding strips beneath the heel piece. Sew 1/4″. Trim if needed. Flip and press.

When laying the first strip down, put it at the angle you want it to be making sure you catch all the fabric below it in the seam allowance.
Keep doing this until you get about 1.5-2″ from the edge of toe.


Add the toe piece.

Continue adding rows above the heel all the way to the top. Adjust the angles of the strips if needed. The top strip doesn’t have to align with the fabric on its underside. Just make sure you are catching the lower fabric in the seam allowance. Trim seam, press, flip, and continue all the way to the top.


Turn over stocking and use the backing as a guide to trim the front pieces.


With right sides together, pin back onto quilted front.

Sew 1/2″ all along the sides and bottom but NOT the top edge. Zig zag raw edges or use a serger to join the pieces. Clip the two inner curves.
Clip the two inner curves as noted on the pattern. Clip close to the seam but not too close.
Turn right side out rounding out the heel and toes parts with your hand or blunt object.

There it is all turned right side out. Look how it puffs up just waiting to be filled with goodies!
The Hanging Loop:
Fold the 2.5″ x 6″ piece in half lengthwise and press. Unfold and take each side and fold it to meet the middle crease. Press the outside edges.


Now bring both halves together and press. After pressing, sew close to the edge.

Fold loop in half and stitch across raw ends to secure them in place. This is tricky and they want to stray, just take it slow and it will go.

I find adding this little row of stitching just above those raw edges on the ends really helps keep the loop aligned as I do the next step.
Pin or glue baste the loop in place at the top inside of the stocking next to the left side seam on the back making the raw edges meet. The loop should be pointing down inside the stocking. Secure with a line or two of stitching about 1/4″ from the edge.


Cuff:
Fold the cuff in half with the short edges together and stitch a 1/2″ seam.

Press seam to side and fold in half with wrong sides together to form a circle. Press so cuff seam is in the middle of the back.


Pin cuff inside the stocking matching the top edge. The pressed cuff seams will match with the stocking seams.

Sew a 1/2″ seam and zig zag or serge. Turn cuff right side out.

Add some trim if you like. Pom poms would be nice. I sewed ric rac along the bottom edge. I’ve always liked ric rac. Do you?
Isn’t it cute!

This stocking is 7.5″ wide and 9″ long with a 4.5″ opening.
This stocking is stuffed! Come back on Wednesday, as I begin to reveal the first of many surprises it holds.

Part Two: So the Kids Want to Make Something, too!
Child’s Project: Ring Wreath

Here’s the one I made. Well, I am young at heart. Does that count?
What you will need:
- Metal canning jar rings (I used the regular size)
 Since these were rusty
 my husband spray painted them.
Since my jar rings were rather rusty, my husband spray painted them ahead of time for me. He was being a very helpful Tu-Na helper.
- Fabric cut into 3/4″ x 6″ strips (I used 30 for my ring but the kids used less.)

Although I brought my rotary cutter and a small mat along to the lake, I forgot the ruler. It was then impossible for me to cut them into straight strips, so I just eyeballed them and cut them with a scissors.
• One fabric string cut 1/4″ x 16″ for the hanging loop or you could use twine, string, yarn, or jute.
Directions:
Show your little ones how to tie a fabric strip around the ring and pull it tight. Keep adding strips, pushing them tightly against the previously tied one.

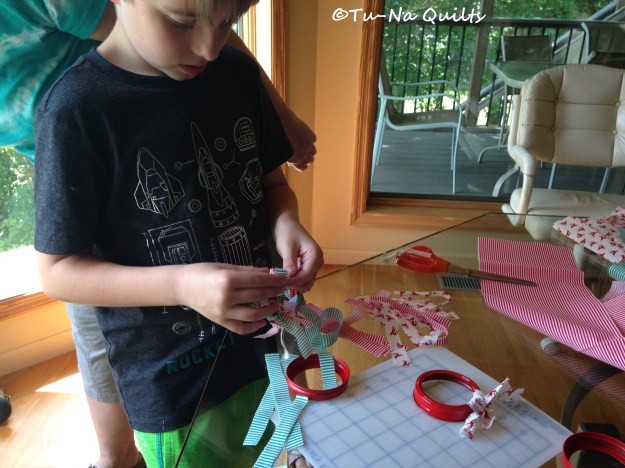
Here’s my 8 year old grandson working on his.

After about 1/4 done around the ring, he was ready for a break.

My two year old grandson picked out the reindeer strips and handed them to me to tie.

The little ones also just wrapped the strips around the rings. But that’s ok, they had fun and later their mommies finished the rings for themselves.
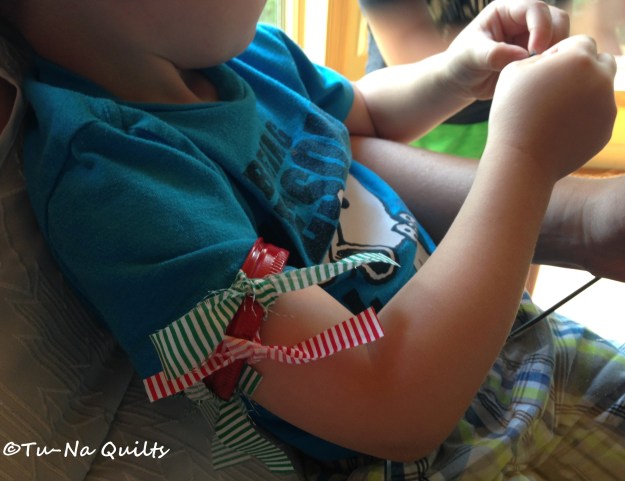
Sometimes they were worn as arm bands.
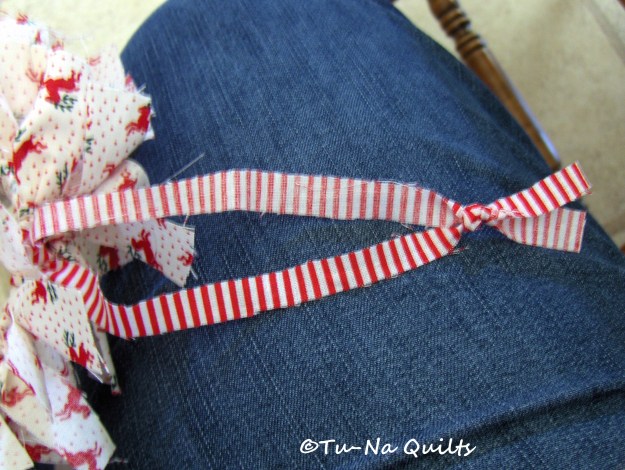
When the ring is filled, push aside a couple of ties so you can tie the 1/4″ x 16″ strip (or string) around the ring for the hanging loop.


Then add a second knot further up creating the loop.

“Ah, mommy, yours is so nice.”

“But I think I like it better as an arm band. Hey, mom, look at my new fit bit.”

Part Three: How You and Your Children Can Enjoy Making Crafts Together:
- Make sure your project is appropriate for the age of your child. If it’s too difficult they may become frustrated. If it’s too easy they may lose interest.
- Break up the process into small sessions. Young children lose attention quickly. Let them come back to work on the project later.
- Don’t expect perfection.
- Show how but don’t take over. It may look very different from what you imagined.
- If the project is a bit too hard, think of things your child can do to help you.
- Be encouraging and offer praise.
- Most of all, have fun together.

What I Learned Today:
- It doesn’t matter if Christmas comes in December or July, it still catches me by surprise.
- Having a summer cold is miserable. I am on week three. Maybe it’s time to visit the doctor.
Question: What gifts do you want to sew this year? I’ve got to sew an apron for sure. My mother-in-law has been asking for one for a couple of years.
Here are the blogs participating in the 12 Days of Christmas in July blog hop!
Friday, July 14th, 2017
The 12 Days of Christmas in July Has Arrived—Day One
Confessions of a Fabric Addict
Saturday, July 15th
We Need a Little Christmas—Day Two
Confessions of a Fabric Addict
Sunday, July 16th
Go Tell It on the Mountain—Day Three
Confessions of a Fabric Addict
Monday, July 17th
Deck the Halls–It’s Day Four of the 12 Days of Christmas in July Blog Hop
Confessions of a Fabric Addict Sarah gives us another sewing assignment just like the others. She’s found some great looking origami ornaments to show us and we can make them too.
Tu-Na Quilts, Travels, and Eats (Thanks for visiting me on the hop.)
Pieceful Thoughts of My Quilting Life Wendy adds a colorful touch to the holidays by showing how to color some holiday cheer with the children. You’ll be running for your box of crayons after reading this.
Crayon Box Quilt Studio Michele made a Christmas quilt. She shows how using charms, half charms, and sashing can make a beautiful quilt for anytime of the year. Look closely at the pics to see some design inspiration in her quilting.
Tuesday, July 18th
Confessions of a Fabric Addict
Wednesday, July 19th
Confessions of a Fabric Addict
Thursday, July 20th
Confessions of a Fabric Addict
Friday, July 21st
Confessions of a Fabric Addict
Saturday, July 22nd
Confessions of a Fabric Addict
Sunday, July 23rd
Confessions of a Fabric Addict
Monday, July 24th
Confessions of a Fabric Addict
Tuesday, July 25th
Confessions of a Fabric Addict
Thanks for stopping by and do come again.
Karen, Tu-Na Quilts
Linking to
- Main Crush Monday at Cooking Up Quilts
- Monday Making at Love Laugh Quilt
- Moving it Forward Monday at Em’s Scrapbag
- Oh, Scrap at Quilting is More Fun than Housework
- Linky Tuesday at Freemotion on the River
- Let’s Bee Social at Sew Fresh Quilts
- Wait Loss Wednesday at The Inquiring Quilter
- Midweek Makers at Quilt Fabrication
- TGIFF
- Finished or Not Friday at Busy Hands Quilt
- Show Off Saturday at Sew Can She

Wow, this is fantastic in capitals!!!! Love the words, the photos, the helpers, and all else. What a day 4, this will be totally so popular, I am on Day 9, and know now I need to have lots of photos and words to, to explain all the parts properly. Thanks so much for today.
LikeLike
Your stocking is so cute! I’m looking forward to seeing what it holds. The wreath project is perfect for kids! Thank you for putting both these tutorials together as a part of the blog hop!
LikeLike
Thank you for sharing these tutorials. It’s nice when we can include the children in the process!
LikeLike
Great stocking, I’m looking forward to seeing what you stuff it with. Love seeing the kids help make the wreath, so cute.
LikeLike
Thanks for sharing. Kids love to make also. We always made a new ornament each year. It helps to bring back each year as we decorate the tree.
LikeLike
What a detailed tutorial! Thanks so much for taking the time to do this and share. The wreath project looks like it would be fun for the kids!
LikeLike
Thank you for your inspiration! My friends at work will love getting a stocking filled with personalized goodies! My grandsons will enjoy making your canning jar wreaths too!
LikeLike
Your stocking is sweet but I esp love the canning ring wreaths to make with children. I’ve saved it for a Christmas time craft to do with mine. Thanks!
ejaneemerson@yahoo.com
LikeLike
Thanks so much for the tutorials. I will definitely be making that wreath with my grandchildren!
LikeLike
Love your stocking and wreath. I see these being included in my Christmas sewing list! I agree – it is hard to “dejunk” – I hate throwing anything away!
LikeLike
Karen, wonderful projects! I can tell the children loved making the wreaths! What a great idea. And the stockings would be a great scrap buster! Excellent photos and instructions!
LikeLike
Great post. Very helpful information.
LikeLike
What a wonderful project to do with my nieces and nephews! Thank you for the wonderful tutorial.
LikeLike
Thanks for this great projects. I love that you included so many photos, it really helps to get the project done.
LikeLike
Very nice.
LikeLike
Love your ideas! I have 2 grandchildren and I think I’m going to see if they would like to make the wreaths with me this year. Have a great day!
LikeLike
Thansk for the tutorials. Love all the pictures!
LikeLike
I also have a summer cold that I can’t shake. Thanks for the great tutorial. The wreaths look like a great project for little hands. Thanks again
LikeLike
Love seeing those little hands working on those cute wreaths!!!
LikeLike
Thanks for the tips. My grandson is 3 and we could easily make a wreath together. My Christmas goal this year is to make a Christmas tree skirt fo r my daughter. I am done, except the binding of the center ring. Since I am ahead on my strata for The QAL I will aim to get that done today. Janice.snell@gmail.com
LikeLike
Thanks for the wonderful tutorials. It’s great to have fun projects for children.
LikeLike
Sweet projects!! I’m planning to make some Christmas themed table runners and placemats.
LikeLike
Thanks so much for your great tutorials and tips. Great ideas. Hope you feel better soon.
LikeLike
Thanks for the cute tutorial for the mini xmas stocking. I agree with you that xmas sneaks up on me every year.
LikeLike
The wreath tutorial for kids is perfect for my nieces. Thanks for sharing!
LikeLike
So cute, those stockings look easy. The holidays always sneak up on me too, I get totally involved with Autumn and Thanksgiving, then it is here before I am ready!
LikeLike
Great tutorial, love all the pictures. The older I get the more visual I need. The wreaths look like a great grandkid project. Thanks
LikeLike
Hi Karen,
I love the stocking, and I need to make one for the new baby-to-be soon. I also love the wreath and most of all, the tips for working with children. Those pictures you shared are priceless and give me a smile. The wreath looks fab as a replacement fit bit. ~smile~ Roseanne
LikeLike
Crazy how we can put some of those desired and treasured gifts on the back burner, hope you get to this year! I am wanting to get a couple of more quilts under my needle, especially one for my son and one for my father~
LikeLike
The stocking tutorial is a great idea. And I think I will share the ring wreath with our church children’s leader.
LikeLike
Thanks for sharing your holiday tutorials. The stocking turned out great and I love the wreath project-it would be a fun kid’s activity using any other holiday fabric too!
LikeLike
Thanks for the great tutorials. I’m an avid canner, and have lots of canning rings that are too rusted to use. I have now got a great way to use them!!
LikeLike
The stocking is so cute, and the tutorial is excellent! Great idea for kids — love the wreath, too! Thanks for the tips for working with kids! Looking forward to seeing what is in the stocking!
LikeLike
Cute projects, I may have to try the wreath with my 4 year old granddaughter, she loves crafts! Thanks for the ideas!
LikeLike
Both projects are wonderful. I think my grandsons would enjoy making a wreath to hang for Christmas!
LikeLike
What a cute stocking – and the tutorial is great
LikeLike
Thanks so much for the great projects. Looking forward to seeing what you have for us next.
LikeLike
When my children were small I enjoyed crafting with them a lot. Oddly…neither one of them are crafters now. Thank you for the fun projects!
LikeLike
Very cute stocking. Loved how you added the heel. Thanks for the tutorials.
LikeLike
Love the little wreaths, great idea! Fun Christmas stocking!
LikeLike
Super projects! Thanks! Cotten.gloria@gmail.com
LikeLike
i love your ring mini wreath; perfect for a family craft session.
LikeLike
That little stocking is so cute! And the fabric wreath is fun and such an easy project to keep those little hands busy! Thanks for sharing!
LikeLike
I have to make 4 aprons actually for my sister , my 2 sisters in love, and one for myself.
LikeLike
a wonderful post. thanks for sharing. I love the stocking.
LikeLike
Fun ideas! Sweet stocking 🙂
LikeLike
Such cute projects. I love the wreath.
LikeLike
Two tutorials! They both are such fun. I am having a good time following along and bookmarking for future reference! So many projects….so little time.
LikeLike
Thank you Karen-two great Christmas projects! Thank you for sharing, Susan
LikeLike
Both are adorable. I love that little wreath and it would be such a fun project to do with the little ones.
LikeLike
The construction for the wreath is genius! Great way to get the kids offline. Hope you feel better soon.
LikeLike
Great tutorials. I’m really interested in the stocking stuffers and will start following your blog so I don’t miss anything.
Hope you feel much better soon.
LikeLike
Nice to have a kid friendly project. My grandchildren will be visiting from Texas this week, but I’m not sure we will have time for a craft project. They have lots of places to go and people to see.
Hope you shake that cold soon.
LikeLike
Fun holiday kid’s crafts! I’m currently working on 5 Christmas stockings, but they are a Christmas gift for me:)
LikeLike
Wonderful tutorial with great photos! Thank you for the great holiday ideas that are easy to make to boot!
LikeLike
An apron might be a good idea for my sister. . . thank you for the inspiration.
Other than that I have some pillows or table runners that I would like to make.
LikeLike
Great tutorials! I love the photos of your grand kids. What a fun craft to make with them!
LikeLike
The ring looks like a fun project I can do with my niece next time she comes visit.
LikeLike
Thank you for such a photo rich blog with great tutorials. Those projects with the kids are always the ones I remember. I just wish I hadn’t been looking for perfection when I was younger. I look forward to the next installment. And thank you for the little tip with the loop. I fight with those so much that I’ve taken to leaving them off potholders.
LikeLike
Thank you for the tutorials on the l ittle stockings and wreaths. I agree, the wreaths are a great project for kids. Easy and quick to complete.
LikeLike
I’m going to grab my granddaughters and make some wreaths! Great tutorial on the stocking!
LikeLike
Great idea on the little wreaths…I’ve seen them done larger but yours are so cute!
LikeLike
Great tutorials. Thanks for the fabulous ideas.
LikeLike
You are one busy gal – so … much …. Christmas.
tvonzalez at gmail dot com
LikeLike
I plan on making some of the bowl holders for holding bowls that have hot food in them.
LikeLike
*Thank you!!*
Great ideas, tutorials, and tips!
By the way, your idea to use the canning rings for the fabric wreaths is wonderful!… Perfect object and size for children to work with! And the idea of painting them, as your husband did, is wise, because if left unpainted they can still rust and spoil the fabric that is tied on! They can remain as keepsake ornaments (tag with the child’s name and date??)…
I’m following your blog now…
Thank you, again!
Pat T.
LikeLike
The stocking is cute. I actually have that holly leaf fabric! I don’t have any grandchildren, but enjoyed reading (and seeing) about doing a project with young children.
LikeLike
Great tutorial! I can’t wait to see what’s in the stocking as maybe I’ll make it for my quilting friends.
LikeLike
Love your stocking, thanks for the turtorial. Many years ago my nieces and I made Halloween wreaths. Still have them. The girls are in their mid thirties now but I still remember the day we did this project.
LikeLike
I like both of your projects and am itching to get out some scraps and make wreaths for a variety of upcoming holidays.
LikeLike
Two excellent tunes with lots of fun pics!
LikeLike
Wonderful stocking and tutorial! I love working with children, and your suggestions are right on target. It’s interesting to watch kids do craft projects, because I learn something new from them every single time! What do I want to sew for Christmas this year? Well, I have a few quilts to finish that I’d like to give as gifts; but like you said, Christmas sneaks up on us so I’m not sure they’ll get done. Thanks again!
LikeLike
Pingback: Tu-Na Quilts: Sounds are Being Heard up on the Rooftop-The 12 Days of Christmas in July Blog Hop Starts Tomorrow! | Tu-Na Quilts, Travels, and Eats
Athanks for the cute ideas
LikeLike
Such a cute stocking and scrappy to boot. I’m all about scrappy. Thanks for the tut too.
The little boy seem to have a grand time and he is a cutie.
LikeLike
I always love seeing things that children can “help” with. What fun to be thinking of Christmas fun at this time.
LikeLike
It’s never too early to start with the holiday gifts and planning. Your stocking is adorable and I’m looking forward to seeing what you have tucked away inside!
LikeLike
Such great projects! I would never have thought to use canning rings for the wreaths. I will be making some for sure!
LikeLike
Thanks for participating in the 12 Days of Christmas in July Blog Hop and that cute kid’s craft fabric “wreath” idea!!
LikeLike
I love the wreath idea it’s so fun to make with the little kids unfortunately mine are more of the ‘ let’s part till4am’ age now. Thank you for the blog hop
LikeLike
I like to make ornaments for Grandchildren and Great Grandchildren.
Thanks for the tutorials, love them.
LikeLike
Two wonderful tutorials. Thank you for them. I plan on making quilts for gifts again this year. Maybe some of the jar lid wreaths also, now 🙂
LikeLike
Thank you for the two tutorials. I will be making quilts again for gifts. Now, some of the jar lid wreaths as well 🙂
LikeLike
THANKS FOR SHARING THIS BEAUTIFUL COLLECTION!
LikeLike
Fun project with the kids. Thanks!
LikeLike
Thanks for the very detailed tutorial. I love being walked through a project. This year I’m making more pillowcases. Some of my nieces are still using the ones I made for them twenty years ago, so it’s time for me to update their Christmas-themed cases. (I think I gave them with the instructions to sleep on them on Christmas Eve only, and I’m so glad to see that they ignored me and have worn/loved them to death.)
LikeLike
One item I need to make is a duffle bag to hold my husband’s meds.
LikeLike
How sweet he brought you a rose! Lovely tutorials! I’d like to make my FIL’s wife a quilt as a gift.
LikeLike
I made a stocking for my DIL a couple of years ago. It was fun! I want to make baby things, since I just found out that I’m going to be a first time grandma next year.
LikeLike
I’m enjoying visiting everybody on this blog hopping – those cute wreaths look great and with the right fabrics can be made to suit any occasion 🙂
LikeLike
I love the wreath idea! It’s a great way to use up small bits of scraps. I really haven’t thought of Christmas gift making yet.
LikeLike
Thank you for taking the time to fully explain your stocking techniques. Love the wreaths as well.
Swoot@att.net
LikeLike
I remember my mom helping my siblings and I make stockings when we were small. This brings back such great memories!
lstangl482 at aol dot com
LikeLike
Cute stocking, I like the heel and toe accents. I’m going to see if I have some holiday fabric to make the wreaths with my grands.
LikeLike
What a great idea for the little wreaths, I think it would be so cute to do a whole tree with them.
Jeri Oldtisme@aol.com
LikeLike
I never would have guessed your little wreaths were canning jar lids. So cute!
LikeLike
Thanks! That stocking is different, and I like different. I enjoyed reading the whole post.
LikeLike
I give a lot of lap quilts at Christmas so I work on them through the year. Probably half of what I need is already complete. Then as the holidays get closer I’ll make smaller items or things I see that catch my interest. Your stocking is very cute, thanks for sharing your method!
LikeLike
What a cute stocking and I love the wreath idea. My grandkids will have a great time with them.
LikeLike
I have those same exact fabrics in my stash! Need some stockings for Christmas and this is the perfect fit!
LikeLike
Cute ideas for the grands! Looking forward to seeing what’s in the stocking. Thanks!
LikeLike
Terrific tutorials! Thanks so much! The pictures were great. I hope to make some Christmas tree skirts this year.
LikeLike
Great projects! Looking forward to seeing what you put in your cute stocking! I want to make some everyday pillowcases for my family–a few years ago I made holiday pillowcases for everyone, now I think they need some fun ones they can use the rest of the year!
LikeLike
Love your ideas!! Will be making stockings soon.
LikeLike
I like your idea! My dream would be to have a stocking filled with quilting goodies!!
LikeLike
Your stocking is cute. I plan on making a wall quilt for one of my granddaughters who is attending Murray State in Kentucky. Their team is the Racers, and the quilt will have 4 horse heads appliqued on it.
LikeLike
Thanks for sharing! I plan to make some table runners and some holiday pillow cases.
LikeLike
Great ideas, and a fabulous tutorial! I must try the little wreaths with the grands – they’ll love it! Thanks for all your efforts to make this hop a success!!
LikeLike
Cute, cute stocking. Thanks for the tutorial.
LikeLike
Sweet stocking and love the rings-easy, fast, fun!
LikeLike
Attractive stocking, and well-written and -photographed tutorial–good work!
LikeLike
I saw love and joy in each of your photos! Crafting with little ones is so bonding and gets everyone in the mood. I look forward to having grandkids someday to do just that. Such pretty wreaths! They’d be great for any holiday!
LikeLike
Sounds like you are a very busy lady with lots of good ideas–thanks!
barbkaup(at)(yahoo)(dot)(com)
LikeLike
Tu-na, I think I posted earlier and cannot remember. I’m fighting some kind of cough and head infection in honor of Christmas in July. I love the stocking and all the hints – I need all of them. I love seeing the children interacting. My granddaughter lives with and my son (her dad) and sometimes says I’m her mom. We just correct her and go on. She hasn’t seen her mom in 17 months. She loves to spend time with me. My son took them camping for 3 days and when she came home, she was glued to me. So, I love to find things for her to do. She just turned 4 earller this month. Thanks again, for all the wonder ideas.
LikeLike
I like the way you pieced the heel on the stocking.
LikeLike
I probably will just make some simple ornaments this year. There is a lot going on around my house.
LikeLike
Love the wreath project for kids!
LikeLike
How fun! It’s so hard to remember to have fun when doing stuff with my kids. When I do though–it’s amazing! I’m finishing some quilts for Christmas this year–I have two left to quilt and one to bind. They’ve been several years in the making and this year feels like the year I’ll finally make it! 🙂
LikeLike
I am hoping to make quilts (lap size for all the in laws this year). I have 3 tops pieced with only 2 more to do. Then the quilting so hope to be done by mid-December.
LikeLike
Pingback: Tu-Na Quilts: O Come, All Ye Faithful (including quilters and crafters)–Day Five of the 12 Days of Christmas in July Blog Hop | Tu-Na Quilts, Travels, and Eats
My 7 year old granddaughter is learning to sew, I think she will enjoy the stocking. Thank you for sharing. 🙂
LikeLike
Great stocking – wonderful that you thought to make the toe and heel in white, as that really adds to the personality! Thanks for the tutorial!
LikeLike
The wreath is really cute. I see it also doubles up as a bracelet!
LikeLike
I love making Christmas stockings and using them to decorate the house. Thanks!
LikeLike
Adorable stockings! I need some of these!!! Thank you.
LikeLike
I enjoyed both of your projects. I think I will make a bag or two for Christmas.
LikeLike
Adorable stocking,Karen and the wreath–what a great idea for a ‘sew with your kids’ project. Will have to try this with Brady when he comes in September. Love the photo of the 2-ye-old wearing his arm bands!
LikeLike
Cute stocking! I hope to make some for my grandchildren.
LikeLike
Super cute stocking. I have 3 more to finish for my family. I really need to get them completed. Thanks for the tutorial.
LikeLike
Very cute stocking!! Thank you!
LikeLike
Pingback: Tu-Na Quilts: The First Reveal—What’s Inside the Stocking? | Tu-Na Quilts, Travels, and Eats
Thanks for great ideas, i haven’t seen a sweet hanger before and think they would be very popular. I am intending to make Christmas placemats and coasters for lots of people, and I have always wanted a special apron for myself. x
LikeLike
Awesome Stocking, I wish I was so organised LOL
LikeLike
Cute little pail! You can never have enough pincushions
LikeLike
I like the wreaths! I’m going to give that a go with my kids 🙂
LikeLike
The wreaths are a wonderful idea for the kids! I can use this project with my 4-Hers!
LikeLike
Thanks for the tutorial on the stocking. I need to make at least one quilt which has already been promised.
LikeLike
I LOVE YOUR STOCKING THANKS FOR THE GREAT TUTORIAL THE PICTURES WERE REALLY HELPFUL. READINGTIRZAH AT YAHOO.COM
LikeLike
The stocking is great Thanks for the tutorial, and I will be making some this year.
LikeLike
It looks like we have a very similar Christmas fabric stash! I love the mini holly fabric. Thank you for the stocking idea!
LikeLike
This is so cute I had to comment again. Thanks so much for linking up to Wednesday Wait Loss!
LikeLike
Cute projects, Karen! I think my son might be old enough for the wreath by the time Christmas is here. Love the stocking and I can’t wait to see what it holds!
LikeLike
This very day , I was thinking I must suss out Christmas stocking instructions . Now I have them . Thank you
LikeLike
The stocking is adorable. I know a little girl who might like to give that a try. I also loved the little pincushions (little items I might have gotten rid of can have a new life). Thank you for sharing.
LikeLike
Pingback: Tu-Na Quilts: All I Want for Christmas is ___ –Day Seven of the 12 Days of Christmas in July Blog Hop and | Tu-Na Quilts, Travels, and Eats
Getting in the mood for Christmas projects with your cute stocking. Thanks!
LikeLike
Thanks for the tutorial for the cute stocking!
LikeLike
Thanks for the cute tutorials.
LikeLike
Great tutorials! The wreaths are so cute for the kids..
LikeLike
Such a cute little stocking! I hope you’re feeling better 🙂 I always make Christmas ornaments for family and friends. I’m not sure what other sewing I may do for gifts this year.
LikeLike
Pingback: Tu-Na Quilts: Tu-Na Quilts: The Second Stocking Stuffer Reveal—You Mean There’s More? | Tu-Na Quilts, Travels, and Eats
Pingback: Tu-Na Quilts: Santa Claus is Coming–Day Nine of the 12 Days of Christmas in July Blog Hop | Tu-Na Quilts, Travels, and Eats
Pingback: Tu-Na Quilts: The Third Stocking Stuffer Reveal—How Much Can It Hold? | Tu-Na Quilts, Travels, and Eats
Pingback: Tu-Na Quilts: Ding Dong Merrily on High–Day Eleven of the 12 Days of Christmas in July Blog Hop | Tu-Na Quilts, Travels, and Eats
I just love stockings! And using that method would make each one unique! What a great project for kids of all ages.
LikeLike
I love the little stocking. So cute!
LikeLike
Pingback: Tu-Na Quilts: The Fourth and Final Stocking Stuffers Reveal–Does the Fun Have to End? | Tu-Na Quilts, Travels, and Eats
Thanks for the tutorials!
LikeLike
So cute!! Love projects my kiddos can help with too!
LikeLike
I love the fabric wreaths. So cute and great to do with kids. Thank you for sharing!
LikeLike
Great tutorials–love the wreath!
LikeLike
Pingback: Tu-Na Quilts: The Day After Christmas in July | Tu-Na Quilts, Travels, and Eats
Pingback: Tu-Na Quilts: Planning Ahead for 2018 | Tu-Na Quilts, Travels, and Eats
your stocking is wonderful. thanks for sharing how you did it.
those are the cutest ornaments.
LikeLike